The Documents tab will display all of forms for your transaction.
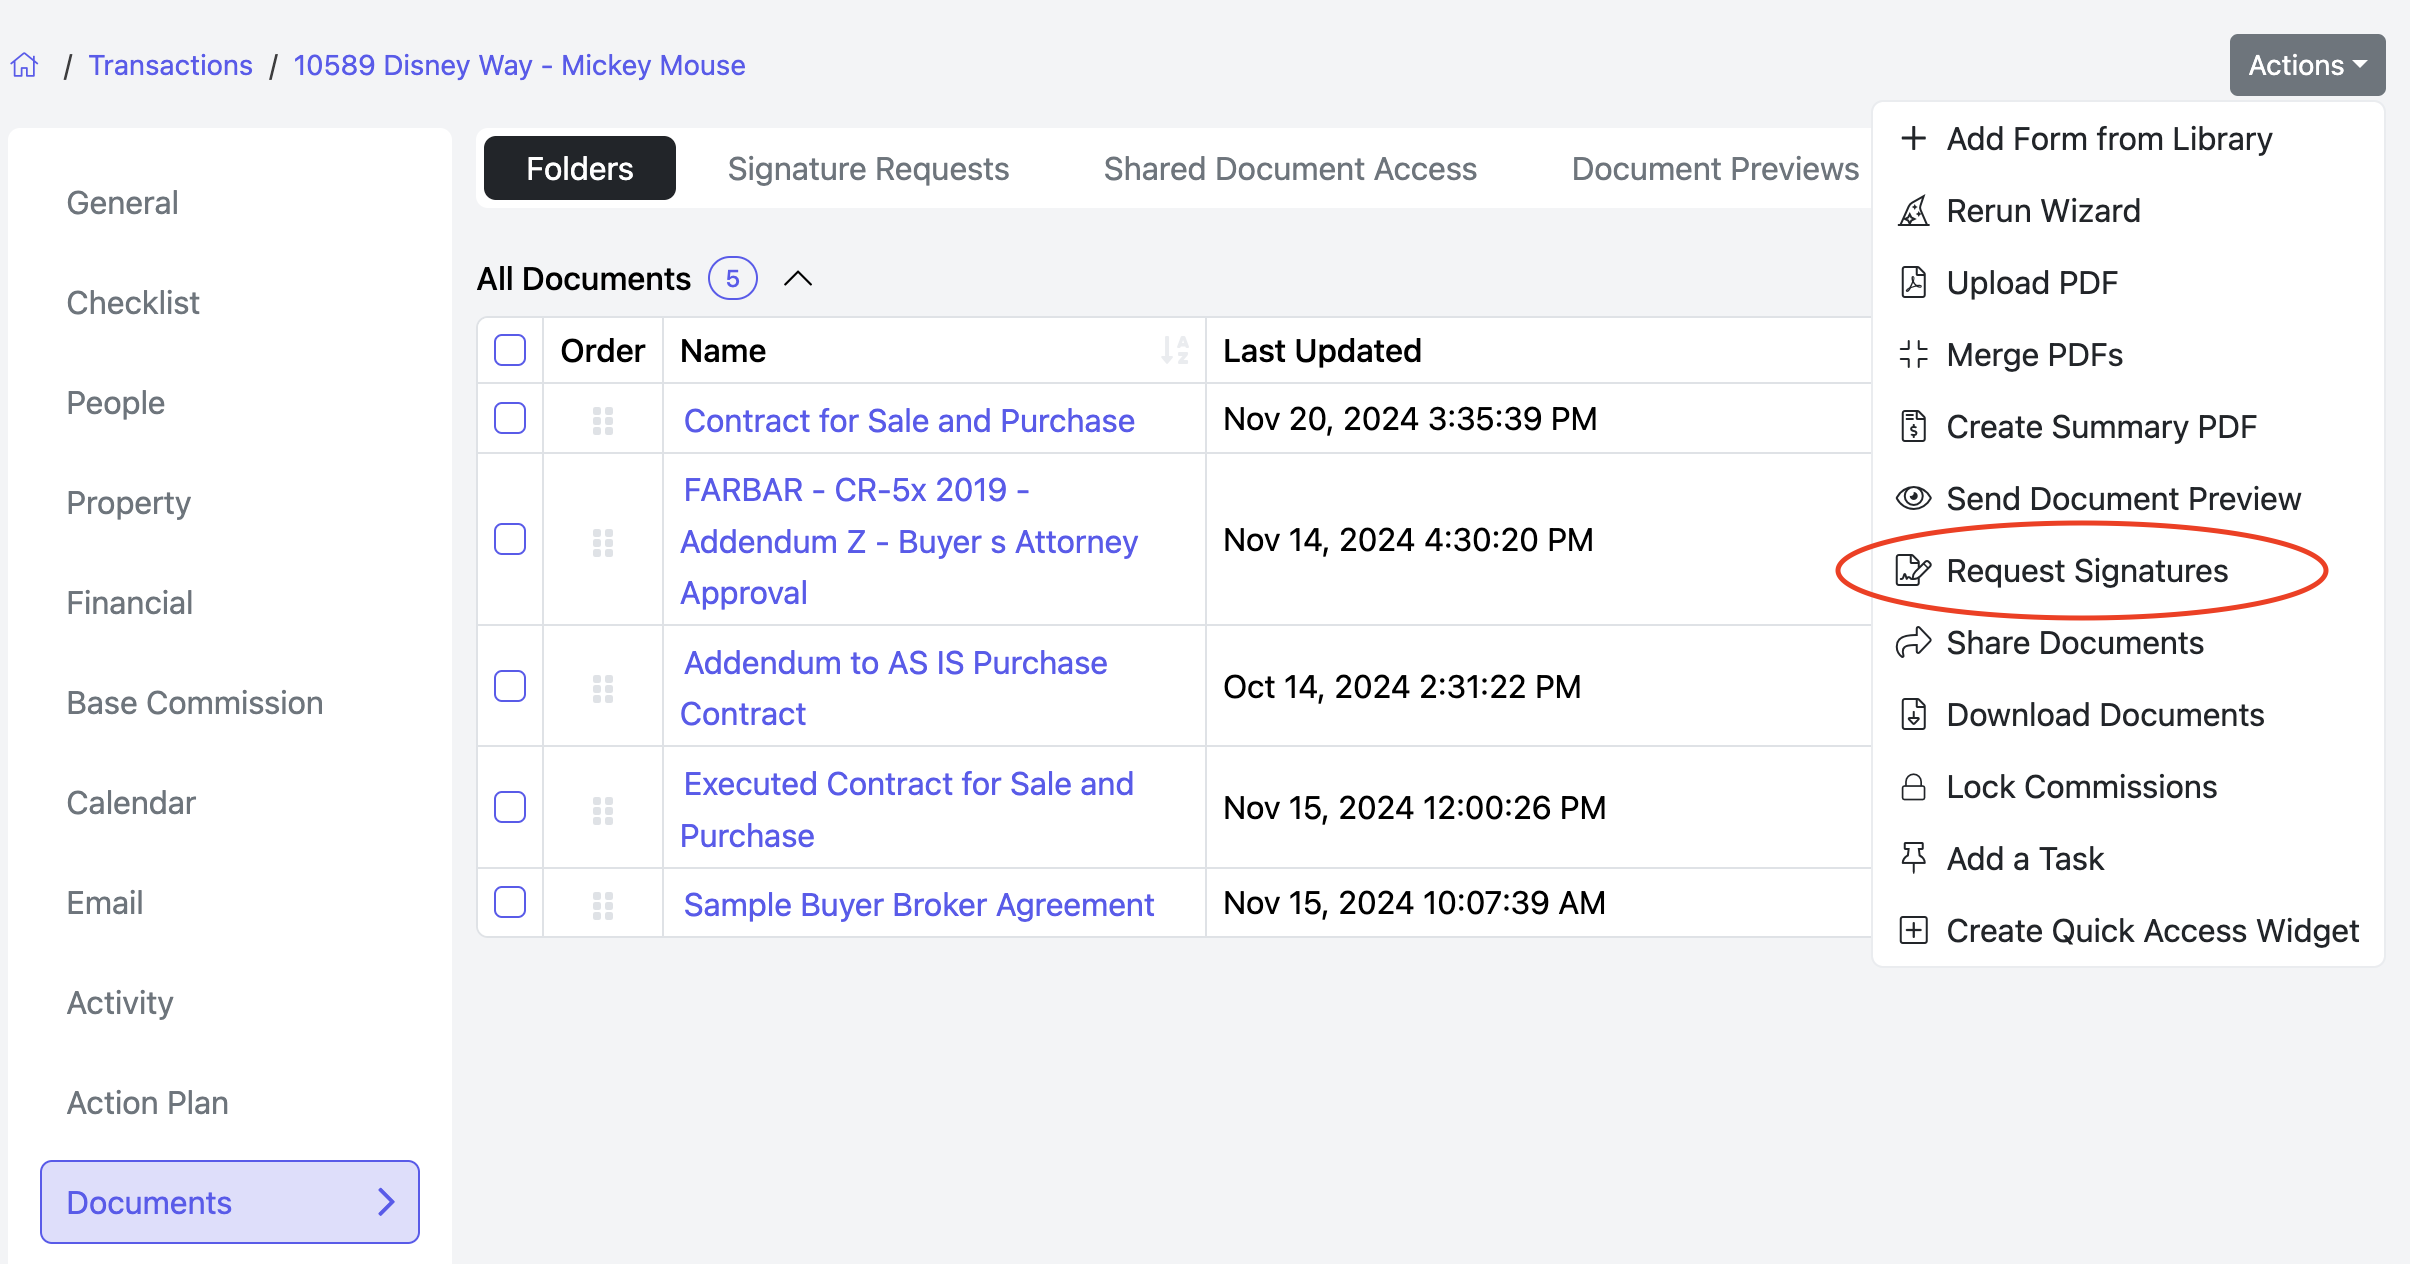
The Actions dropdown shows the following selections.
If you are working within a document, you may also access the Actions dropdown menu for additional options.
Click on a title for it's detailed instructions.
Quick Close
Working within a Document
QUICK CLOSE
Quick Close allows managers to complete several post-closing tasks at once, including:
- Changing the transaction status
- Syncing the transaction to QuickBooks and/or Payload
- Locking commissions
Before using Quick Close, verify that the following information is complete and accurate:
- Property Address
- Closing Date
- Base Commission
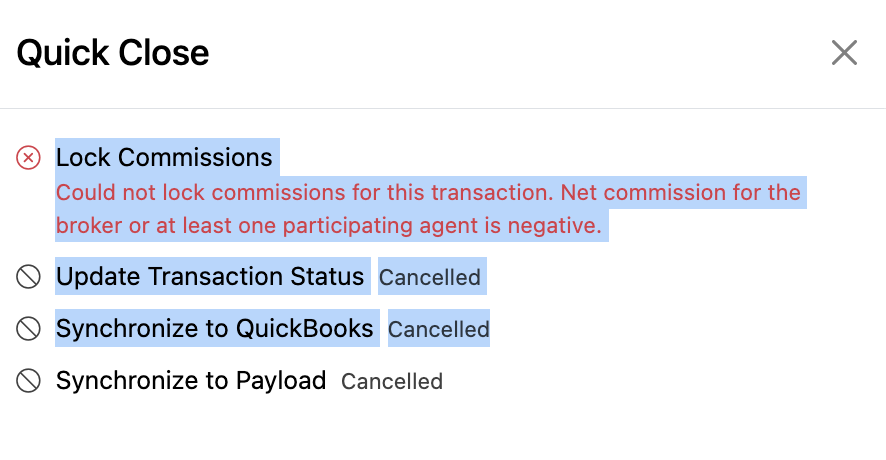
If any required information is missing, an error message will appear and the transaction cannot be processed until the information is saved.
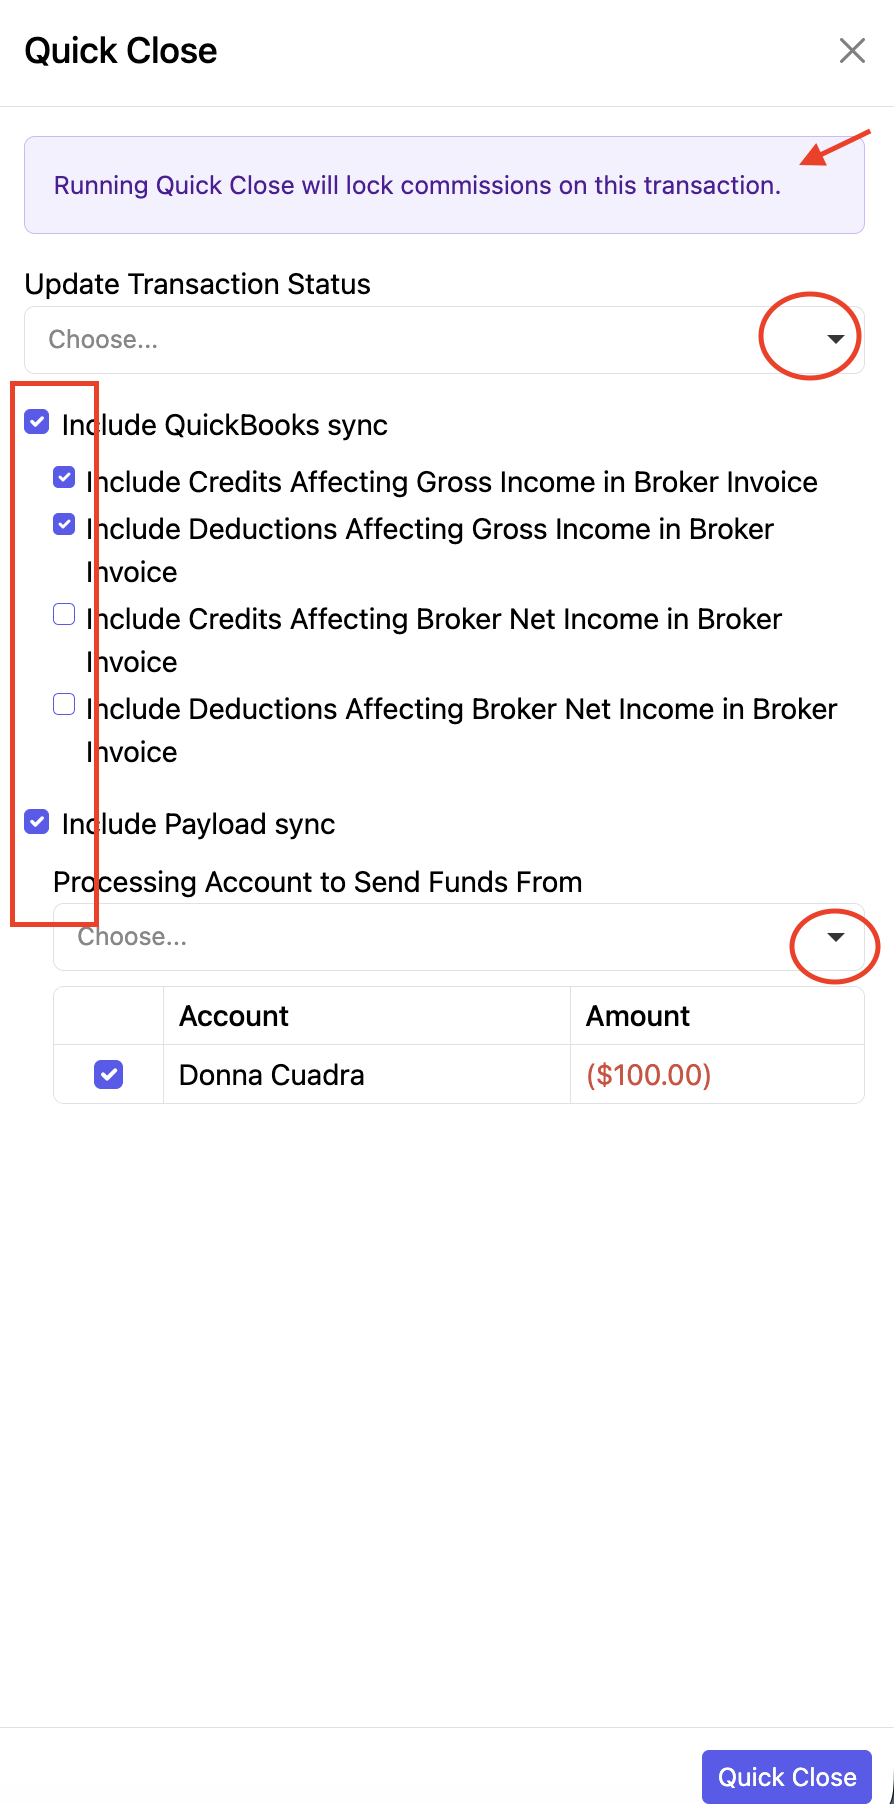
To use Quick Close:
- Select the Transaction Status from the dropdown menu.
- Choose whether to sync the transaction to QuickBooks and/or Payload.
- Select the Processing Account that the funds will be sent from.
- Review the displayed agent(s) and their net commission amounts.
- Click Quick Close to complete the process.
Once completed, the transaction status is updated, the selected syncs are performed, and the commissions are locked.
ADD FORM FROM LIBRARY
To add documents to a transaction, click the “Actions” menu at the top-right corner of the page, within the transaction, then click “+Add Form from Library”.

You can type the first few letters in the search box to only show the forms that match your search.
Or, click on the group of your desired form to see the dropdown list of forms.

Select the form(s) you want to add to your transaction.

Scroll to the bottom and click “Save".

Your form(s) will now be added to this transaction.
RERUN WIZARD
The "Rerun Wizard" is a feature within the Actions section of a transaction. It allows you to reload the initial transaction wizard questions, facilitating updates and modifications to your transaction based on the latest developments.
Benefits of Using Rerun Wizard:
- Efficiency: Quickly update transactions without starting from scratch.
- Accuracy: Ensure all necessary forms and checklists are included as per the latest transaction status.
- Flexibility: Adapt to changes in the transaction (e.g., a listing going under contract) seamlessly.
How to Use Rerun Wizard:
1) Access the Transaction:
Navigate to the specific transaction you wish to update.
2) Locate Rerun Wizard:
In the Actions section of the transaction, find and click on the "Rerun Wizard" button.
3) Answer Updated Questions:
The transaction wizard will prompt you with a series of questions. Answer these to reflect the current status of your transaction.
4) Review and Confirm:
Once you have answered the questions, review your selections for accuracy and completeness. Complete the transaction wizard to apply these updates to your transaction.
Use Case Example:
If you have a listing that just went under contract and needs a different set of forms, simply use the "Rerun Wizard" to update the transaction. This eliminates the need to create a new transaction or manually add forms.
UPLOAD PDF
To upload a document to your account, click the “Actions” menu at the top-right corner of the page, then click “Upload PDF”.

Read the disclaimer that pops up and click the box if you agree. Then, click “Upload”.

Drop or browse for the file(s) on your device.
Click "Upload"

The system will go through the process of Processing and Saving.
Once completed, the uploaded document will be at the top of the Documents list.
MERGE PDFs
This feature allows you to merge forms that are in the Editing status.
Click “Actions” then “Merge PDFs” at the top-right corner of the “Documents” tab.

Type in a name for your new merged document.
Select the documents you would like to merge by checking the boxes.

Once you’re done, click the box that says “Archive Documents on Merge” if you would like to archive the old documents. Click “Submit” to create your new document.

Your new merged document will now be listed at the top of the Documents tab.
CREATE SUMMARY PDF
You have the ability to generate a Transaction Summary PDF. This document will present all pertinent financial details associated with the transaction. The content of the summary varies based on the user's role:
Non-Manager Agents: The PDF will display only the commission information relevant to the individual agent who generated the document.
Office Managers: The summary will include commission details for all agents involved in the transaction, excluding any commission information pertaining to the brokerage itself.
Brokerage Managers: The document will encompass comprehensive commission details from the commissions tab, covering all participants in the transaction.
You also have the option to download the summary to your computer directly. This might be preferable if you choose not to add the summary to the transaction's document tab, especially when dealing with sensitive information. Vendors with balanced credits and deductions (resulting in a net zero) will not be featured in the Summary PDF.
To create this PDF, navigate to the transaction and go to the actions button at the top right of the page and click on Create Summary PDF.

Choose one of the following:
Add to Transaction:
Add a summary document to the Documents tab. Any sensitive financial data contained in the document, such as agent splits, will be visible to all participating agents.
Download: Directly download a summary document for this transaction.
Then, choose either the Standard Summary PDF or the Simple Summary PDF.
Standard Summary PDF:
This gives you the option to include the Agent's net income for the entire year and add in Transaction Financials. In addition, you can choose to generate this summary for a specific account, so only commission information for that agent will be visible without any other managerial or other agent commission information.

Simple Summary PDF:
This version has a less detailed breakdown of the commissions.
When selected, each agent and vendor on the transaction will appear below.
You can select the checkmark "Disburse Funds to Brokerage" to mark them as payable to the brokerage.
You also have the option to override a vendor detail so that it only appears on the generated simple summary PDF.
It will not replace the vendor detail on their Vendor page, just on the summary PDF.
A use case of this would be if you have a detail called "Wiring Instructions," you could leave it blank on the Vendor page and override it upon each transaction summary with the specific wiring instructions. The detail and the option to override will only appear if the relevant Vendor Detail user field is marked to appear on the Transaction Summary PDF.
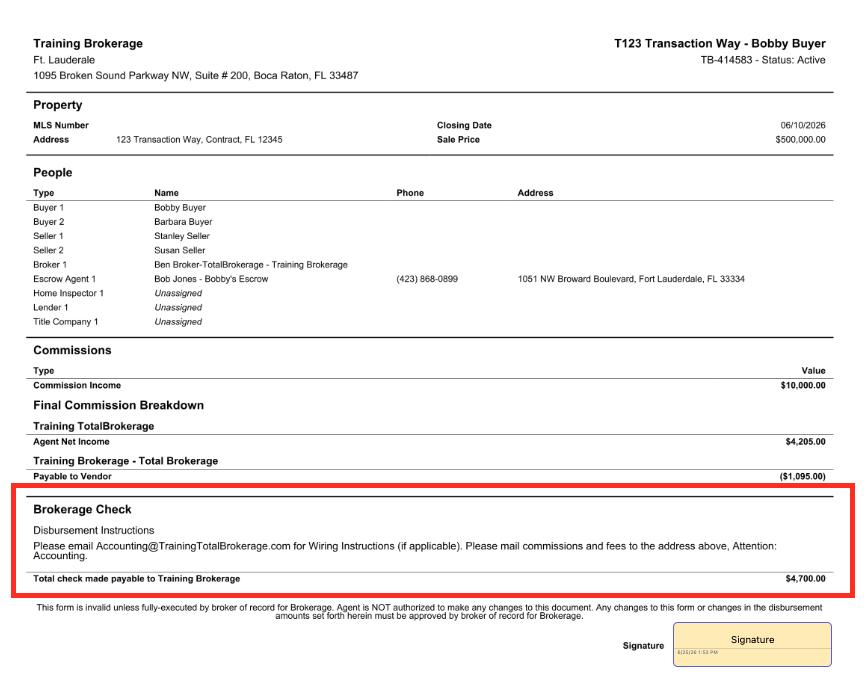
Below is an example of a standard Transaction Summary:
It will have an initial field for the broker to sign on the bottom of every page and a signature field on the last page.

Below is an example of a Simple Summary PDF: 
NOTE: If the Broker has set up specific Disbursement Instructions, they will display below the Commissions breakdown:
SEND DOCUMENT PREVIEW
TotalBrokerage allows you to share previews of Documents in Editing Status with external parties, such as clients or vendors.
This feature provides a viewing link that recipients can use to view and download the document preview.
NOTE: this is different from the Share Documents feature, which is used for Documents in Signed Status.
STEPS TO SEND A DOCUMENT PREVIEW
1. Access the Document Preview Feature
- Navigate to the Documents tab within a transaction.
- Click “Actions” in the top-right corner.
- Select “Send Document Preview.”

2. Select Documents to Share
- Choose the documents you want to share.
- Reorganize the document order by dragging the 4-way arrow on the right.

Note: You can also initiate the Send for Preview action directly from the document by selecting Actions > Send Document Preview. The document will automatically be selected in the document list.
3. Choose Recipients
- Select the contact or vendor to share the documents with.
- To add more recipients, click the “Add” button and select additional contacts.
4. Send the Document Preview
- Once all documents and recipients are selected, click “Send Email.”
- Each recipient will receive an email with a viewing link, allowing them to view and download the document preview.

REQUEST SIGNATURES
These requests do not expire until the agent cancels the request.
- It will bring you to the following page, where you can select the document(s) you want to send out for signature.
- You can use the Select All button to quickly select all documents.
- You can also drag the icon in the Order column to rearrange the order in which the documents are presented for e-signature.

- If a document is not on the list of documents, click on the Document missing? button, and it will show you which documents can't be signed and why.

- In the next section, you can choose which signers you want to request, and the method of signing (email, SMS, or on this device).
- You can also choose to send them an automated daily email reminder for a specified number of days after the signature request or until they sign.
- If the reminders option is selected, you can also choose to cancel the signature request at the conclusion of the reminder emails, or if the recipient opts out of the reminders.

Send Email - You may choose which email to send the signature request to and add comments to the email for the signer.
Send SMS - You may choose which phone number to send the signature request to and from. This option will appear if your brokerage has SMS messaging in its plan.
Sign On This Device - This will allow the signer to sign on the same device you are sending the request from. This is ideal for in-person signing or if you are signing a document yourself.
Add signers for the same documents by pressing the + button.


Remove a signer by clicking the X.

OPTIONS:
- Send Signature Requests One by One, which will make it send to one signer at a time in order.
- Require Wet Ink Signing, which requires the signer to use a touchscreen or mouse to sign.
- Require Geolocation, which will share their location when they complete the signature request.
- Share documents after Signing with Accounts, Contacts and Vendors. When this checkbox is selected, you can add contacts, vendors, set an expiry date of never, 1 day, 1 week, or 1 month, and add comments. After all signature requests are completed, this feature sends a document share to chosen contacts and vendors. If a request is canceled or expires, shares won't be sent. Any unsigned documents will be auto-marked as signed for sharing.

- After you are done filling out the Signature Request, press the blue Send button at the bottom right to send the signature request.
- After you click Send, you will be brought to a status page that updates you on when they have viewed/signed the requests.


For additional Signature Request information, CLICK HERE
SHARE DOCUMENTS
Documents in Signed status can be shared with Contacts or Vendors.
NOTE: Documents must have the status of Signed in order to be shared.

Select the document(s) you want to share.

If you notice any missing documents, click the Document missing? button to see why those documents aren't included.

Note: You can also initiate the Share Documents action directly from the document and the document will automatically be selected in the document list.
Select the contact or vendor you want to share the document with.
If this contact or vendor is not a part of this transaction's people tab, please uncheck the box to only include people on this transaction.
Then select which email from the contact or vendor you want to send the share to.
You can choose that the share sent to the recipient is only active for a certain period of time.
You can also add comments you want to send with the share as well.

You can add additional people to share with by clicking the Add button.

For additional 'Share Documents' information, CLICK HERE.
DOWNLOAD DOCUMENTS
This allows you to combine documents and download them into one PDF.

On the following pages, you can select which documents you want to download and in which order you want them to appear in the downloaded documents.
You can select all documents by clicking the top checkbox or select specific documents by clicking the checkbox next to the document.
To re-order the documents, use the icon in the Order column.
When done selecting and ordering documents, press the Download button to download the new document.

LOCK COMMISSIONS
Locking commissions in TotalBrokerage transactions ensures that all commission data is finalized and preserved, allowing agent production to be calculated accurately. It also ensures that tiered commission plans function correctly, as locked commissions are required for those calculations to apply properly.

After selecting to Lock Commissions in TotalBrokerage, click Yes and Okay in the pop-ups to confirm.


It’s recommended to update the transaction status to Closed once commissions are locked to keep records accurate and complete.
If updates are needed in the Base Commission tab, you can simply unlock the commissions, make the necessary changes, and then lock them again once everything is finalized.

ADD A TASK
Create a reminder to keep your transaction on track in TotalBrokerage by selecting Add a Task.

A drawer will open on the right where you can Create a New Task.
Enter a description, choose the date and time, and click Save. 
Once created, the task will appear in the transaction’s Calendar tab , as well as on your Dashboard under To-Do’s, helping you stay organized and on schedule.


CREATE QUICK ACCESS WIDGET
Create a quick access widget in TotalBrokerage so you can easily access your transaction right from the dashboard. Simply add the widget and select the desired transaction—this allows you to jump directly into it without needing to search, saving time and keeping your workflow efficient.

Click the color bar on the right to select a base color, then click within the center box to fine-tune and choose the exact shade you want.
Click Save.


Now, you can easily access the transaction from your Dashboard by clicking View within the Widget.

To remove the widget, you can either click Edit Widgets from your Dashboard and click the minus button in the widget and click Done, or open the transaction and go to Actions > Remove Quick Access Widget.