Brokerage Managers can customize fields and set up notifications to better manage Accounts and Users. Click on a subject to jump to its details:
- Account Details – Create custom fields to collect important information about your users.
- Account Files – Provide a centralized place for documents that users can read, upload, or sign.
- Alerts – Set up notifications for key dates based on information stored in Account Details.
You may also choose to have these fields displayed in the Account Profile, and determine which fields users are allowed to edit.
Please note that access to the Human Resources section depends on the TotalBrokerage plan associated with your account.
If you would like to upgrade, please email Support@TotalBrokerage.com.

Setup > Human Resources > ACCOUNT DETAILS
Here is a list of the Account Details fields which have been created.
To search for an item, you may search by Office. If no office is selected, then Brokerage-level details will be shown.
To add a new item, click +Add Item at the top of the list.
To make changes to an existing item, click Edit in the Operations column.
To re-arrange the displayed order, use the icon in the Order column to drag and drop as needed.
Click Save after any changes are made.

+ Add Item
- Choose the Office (if applicable) - Leave this blank for Brokerage-level
- Type the Name into the Item Text field.
- Click into Unique Field Code and the code will automatically generate. (do not type here)
- Type: Use the dropdown menu to see the text/data types
- Date (used for any date which has begun prior to today's date)
- Recurring Date (used for dates which will automatically advance based on a specified time frame. Today's date is the earliest that can be selected.)
- Text
- Number
- Currency
- Choose One
- Choose Multiple
- You may also choose to have this information shown in Account Profiles and Allow accounts to modify this information from their profile.
- Click the blue “Add Item” button to save the field.

Once finished adding or editing fields, click Save.

Setup > Human Resources > ACCOUNT FILES
These are documents that will need to be saved in an Account's file.
A place for any form that the Account may read and sign, or upload will need to be created here.

+Add Item
- Choose the Office (if applicable) - Leave this blank for Brokerage-level
- Item Text: this is the name of the field
- Click into Unique Field Code and the code will automatically generate. (do not type here)
- Folder: this field is optional
- Type: Use the dropdown menu to see the text/data types
- You may also choose to have this information shown in Account Profiles and Allow accounts to modify this information from their profile.
- Click the blue “Add Item” button to save the field.

Once finished adding or editing fields, click Save.
Active and Inactive User Fields
A Field is Active when it is checked.
If you want to make a field no longer active (or no longer appear as an option), click to Uncheck the box in the Active column. Click “Save”.

NOTE
Once a User Field has been created, you cannot delete it (in accordance with our "retain everything" approach).
Click Here for Account Details and Account Files examples.
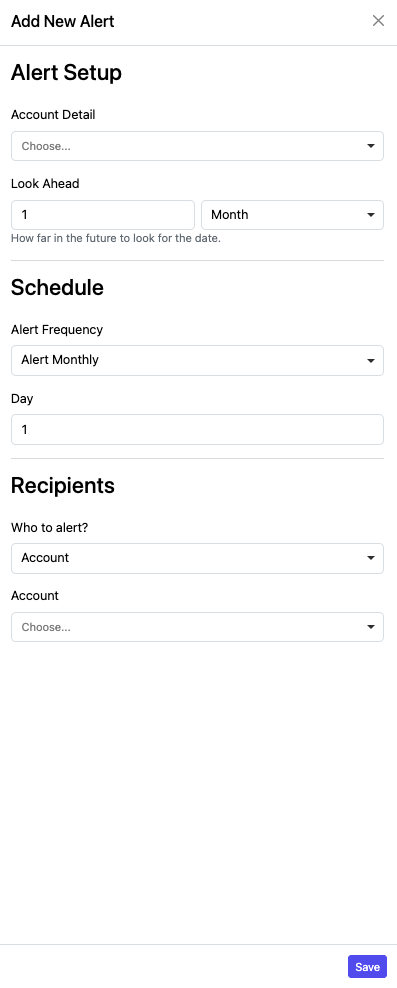
Setup > Human Resources > ALERTS
Within Human Resources Alerts, you can configure notifications for upcoming dates based on information in the Account Details section.

To create a new alert, click “Add New Alert” and complete the following fields:
- Account Detail – Select the specific detail field you want to track
- Look Ahead – Choose how far in advance you’d like to receive the alert
- Schedule/Frequency – Set how often the alert should be sent
- Recipients – Select who should receive the alert (either a specific user or by role, such as Manager or Human Resources Representative)
- Once all fields are completed, click Save.