Here, the Brokerage Manager will create the default settings for all Transactions.
Go to Setup > Transactions to create your transaction settings.

Click the name of any tab to jump to detailed instructions:
GENERAL
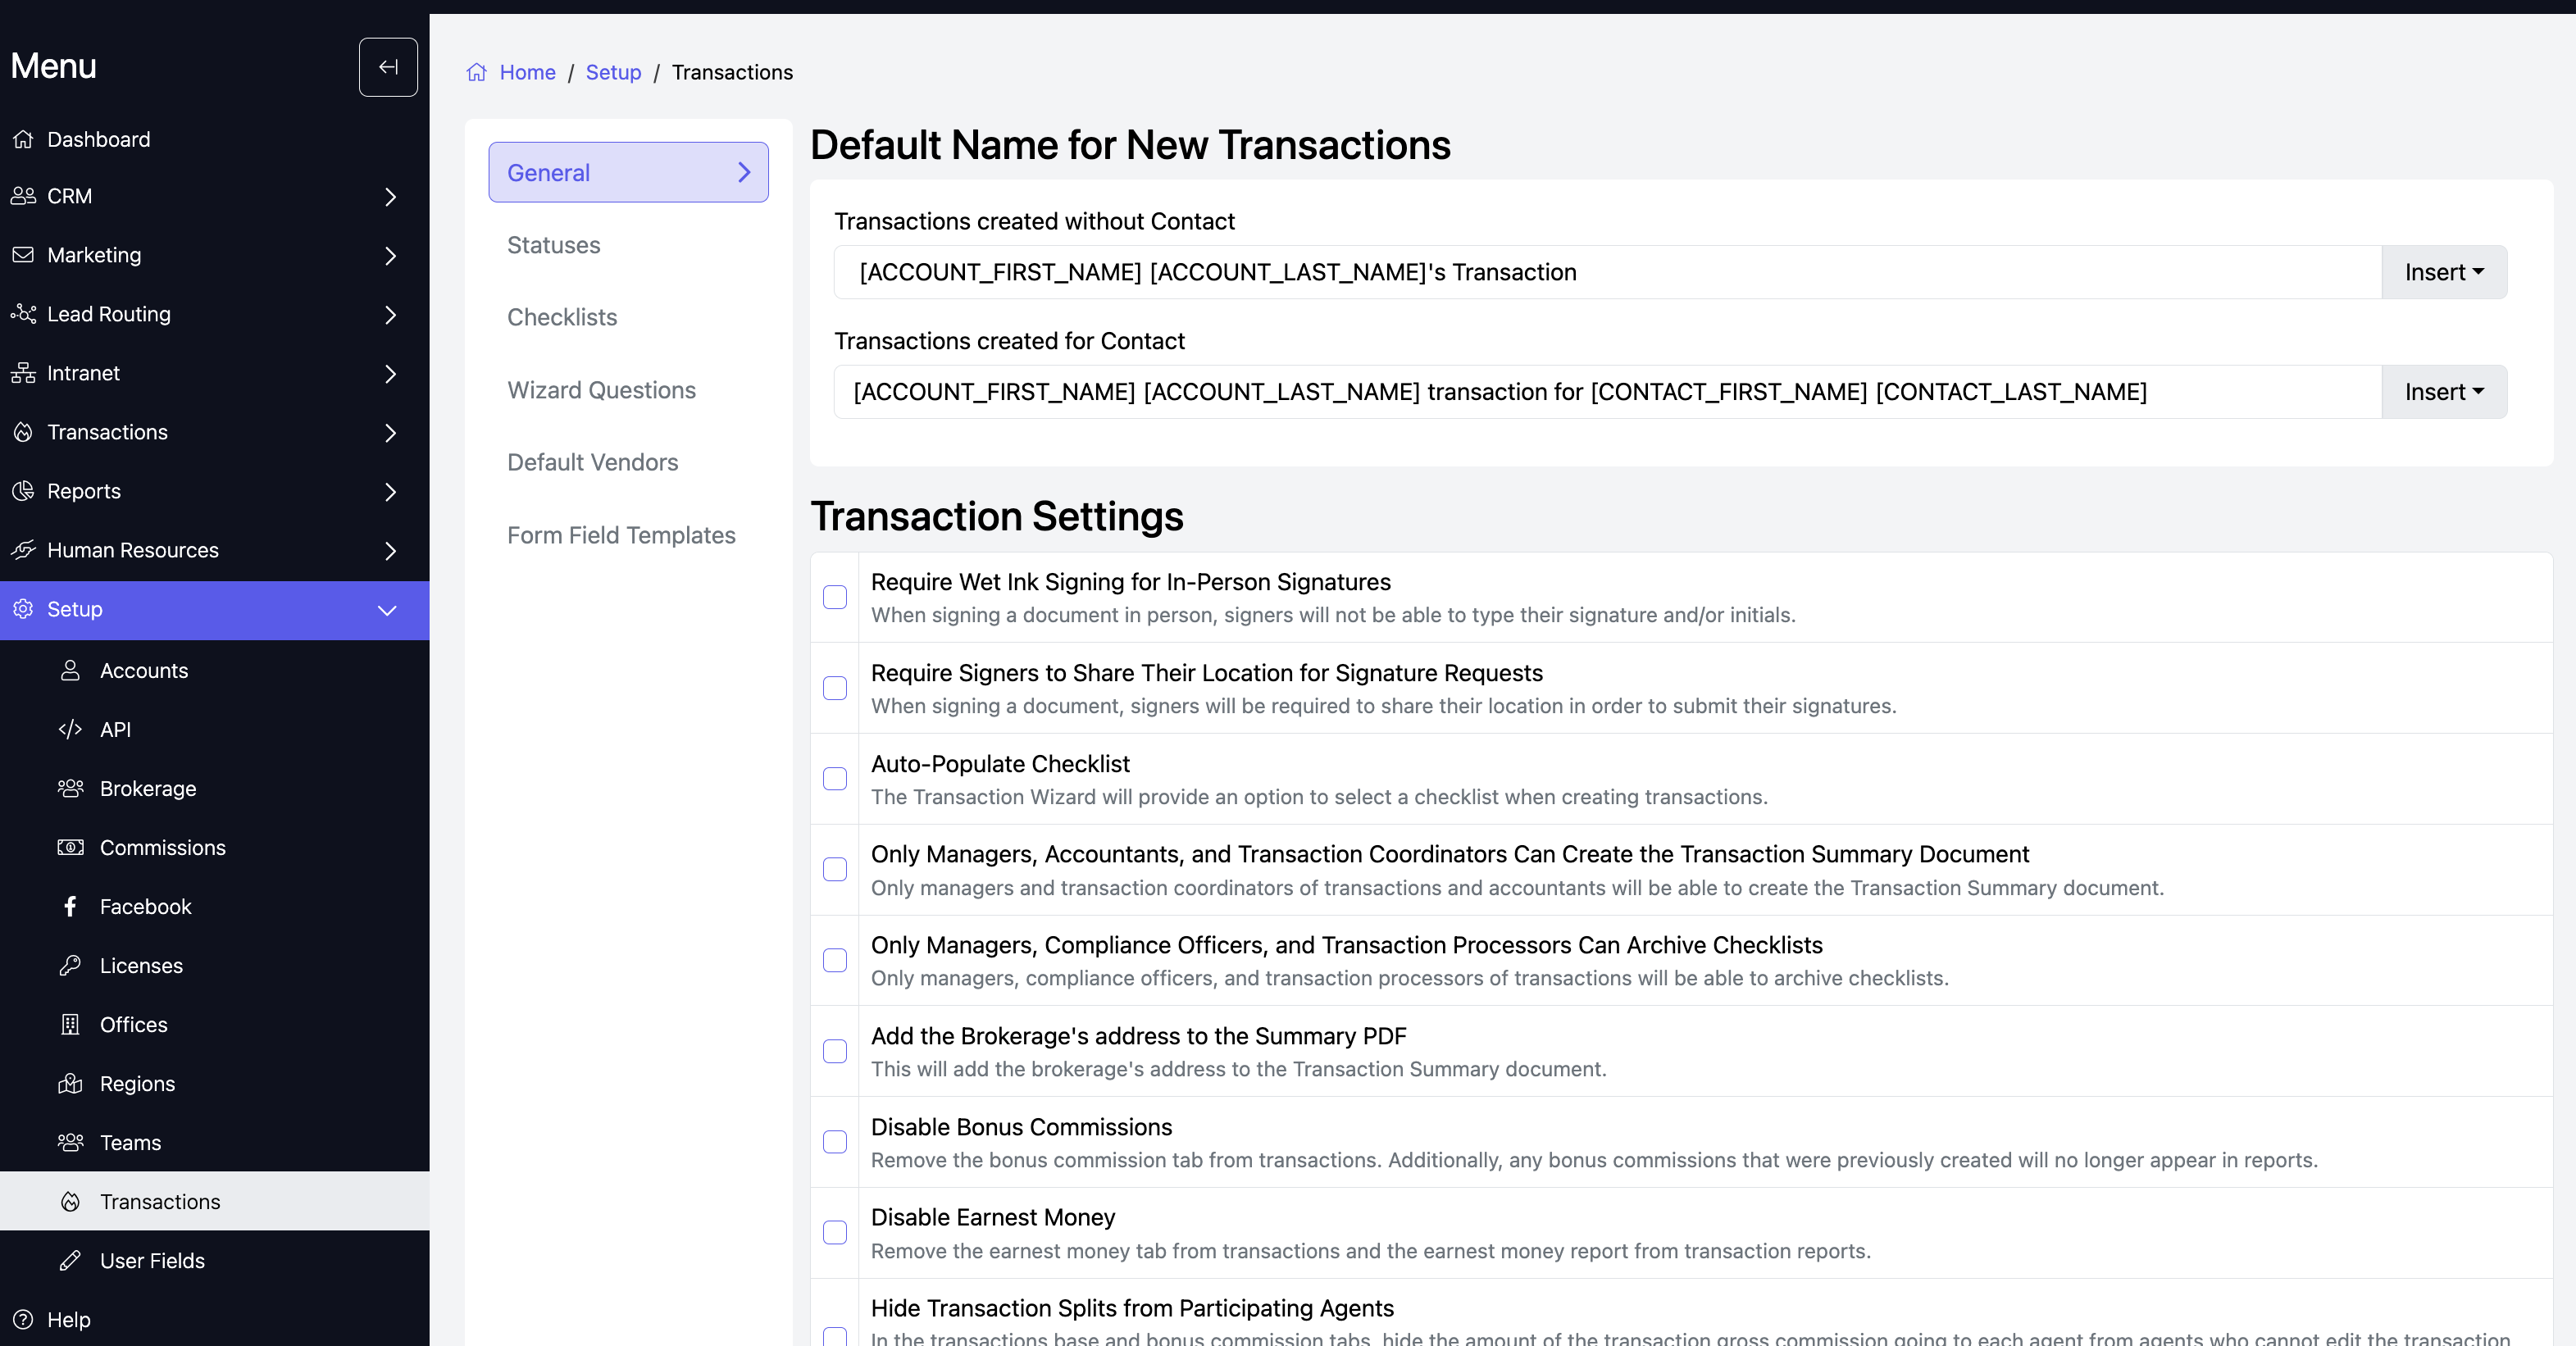
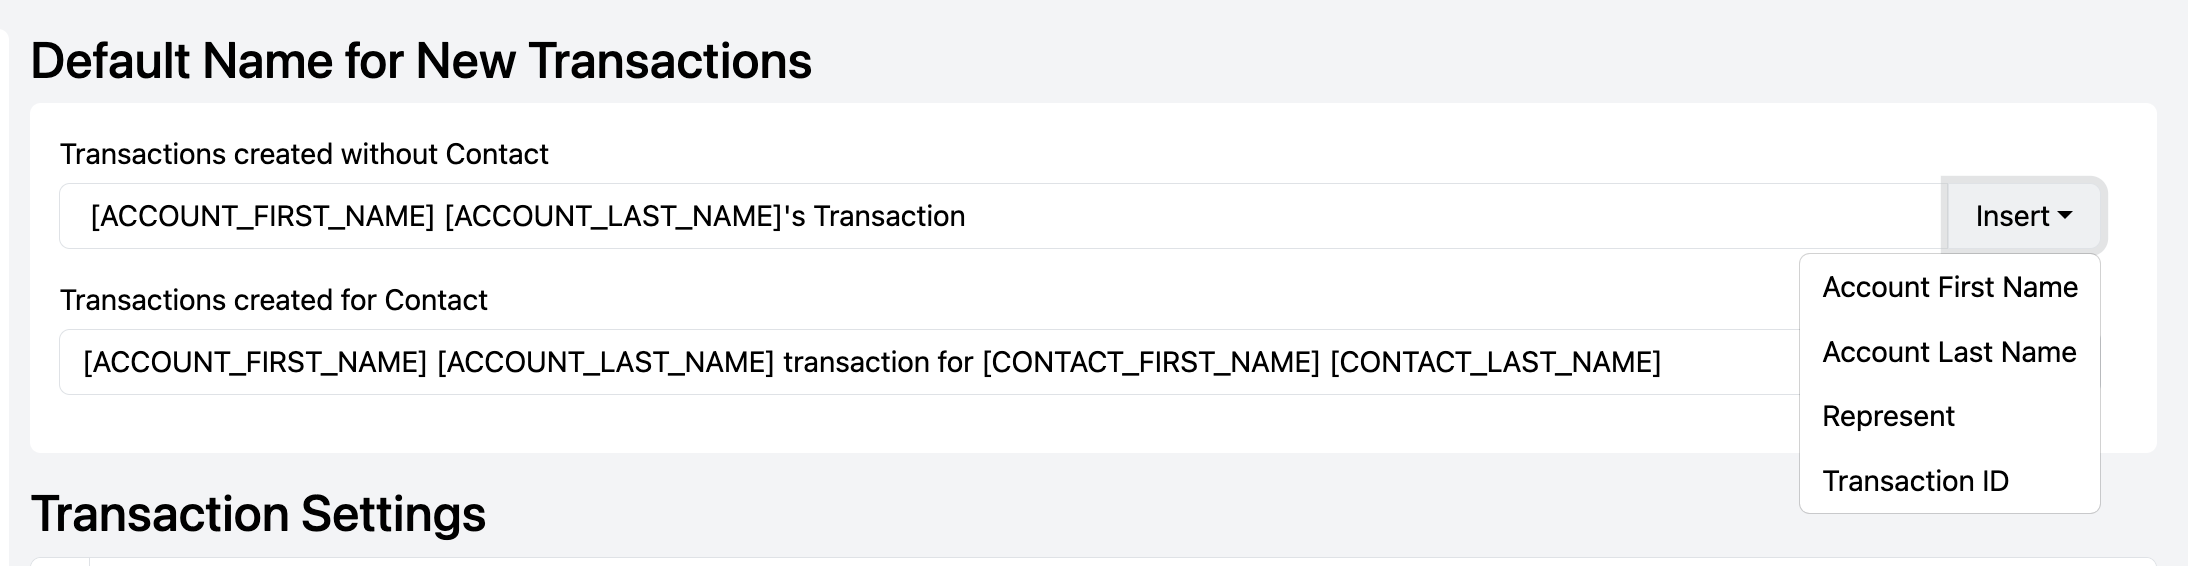
Default Name for New Transactions
You will see that there are two different default transaction names. One is used if you create the transaction from within a contact, and the other is used if you create a transaction from the View Transactions page.
These menu items will add text to the input in brackets "[ ]." When the transaction is created, these fields will automatically be replaced with the information from your account or contact.
Transaction default names for transactions created without a contact:
Transaction default names for transactions created with a contact: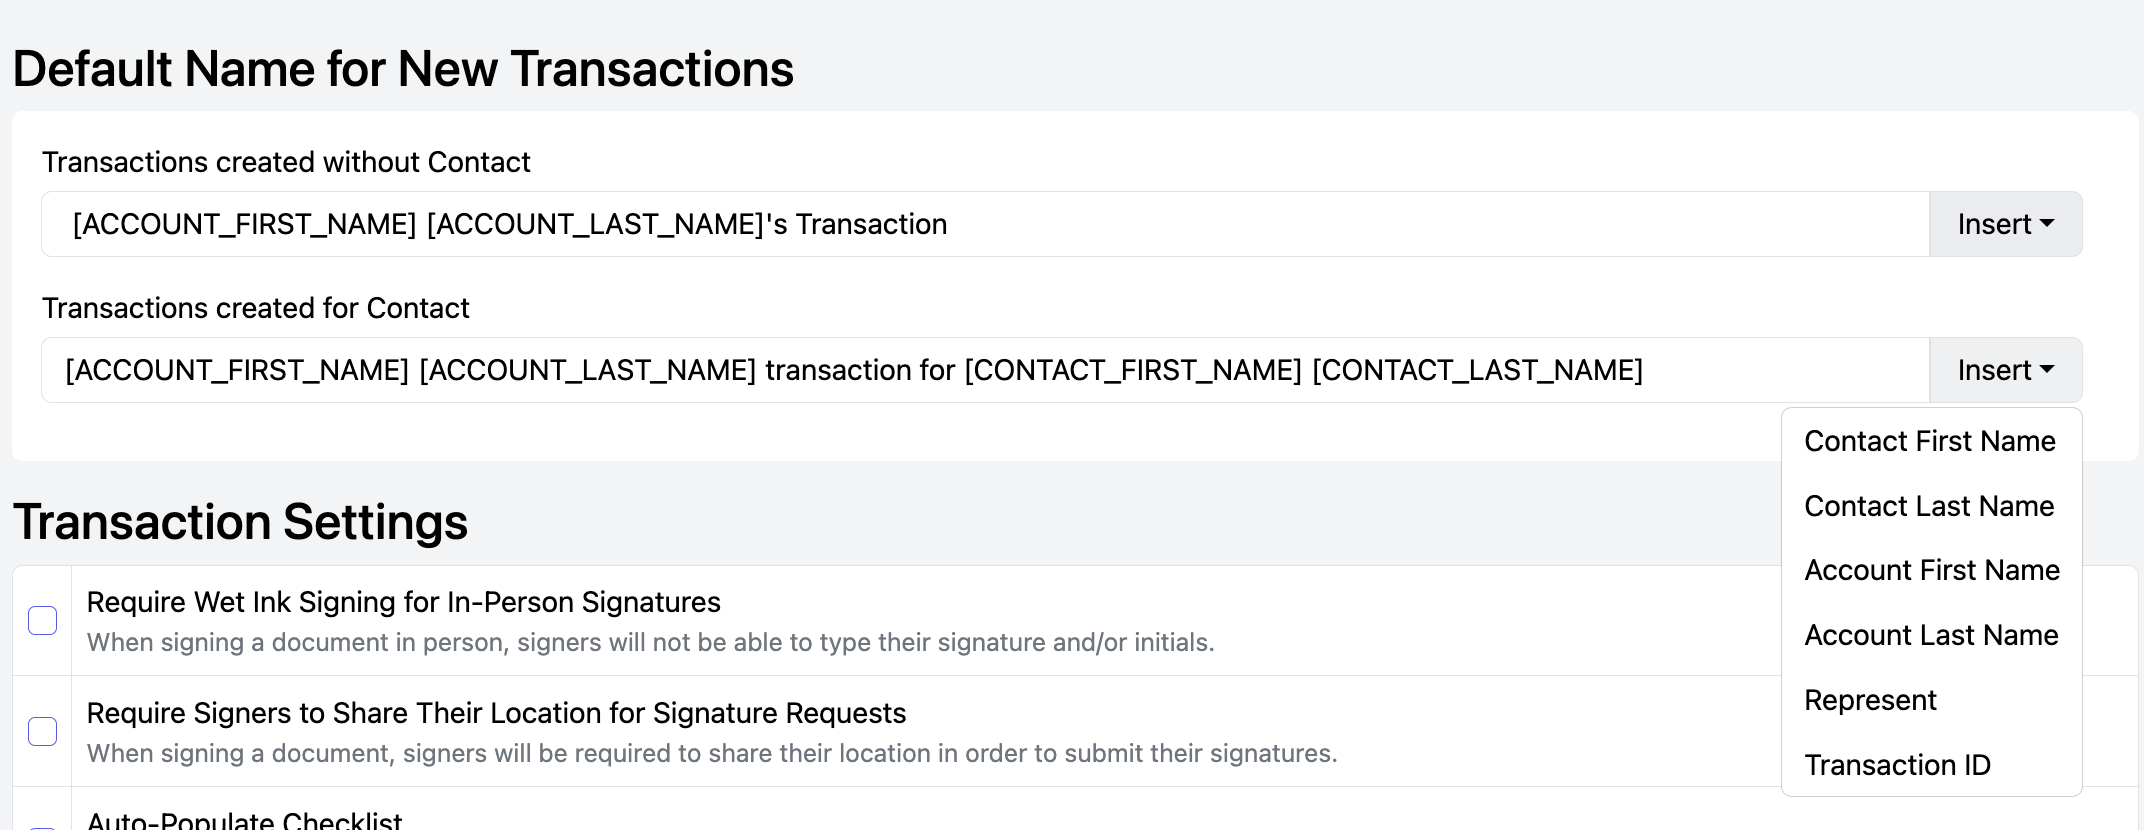
TRANSACTION SETTINGS
Require Wet Ink Signing for In-Person Signatures: This setting will require that the signer use their cursor to sign (or their finger if signing on their phone). Typing their signature or initials will not be available. If this is NOT selected, there will be the option to require this within the transaction signature request process.
Require Signers to Share Their Location for Signature Requests: Selecting this will require that all signers share their location to sign their documents.
Auto-Populate Checklist: Selecting this will automatically add the Compliance Checklist to the transaction.
Only Managers, Accountants, and Transaction Coordinators Can Create the Transaction Summary Document: This document is a complete summary of the transaction information and is formatted to include the Broker's signature. Select this option to allow only these roles to create the document.
Only Managers, Compliance Officers, and Transaction Processors Can Archive Checklists. This means the Agent will not be able to archive a checklist. Only these roles can do so if archiving a checklist is necessary.
Add the Brokerage's address to the Transaction Summary PDF: This is especially helpful when providing the Transaction Summary PDF to the Title Company before ensuring that Brokerage checks are sent to the correct address.
*If selecting this option, please verify that the Brokerage Address has been added to Setup > Brokerage > Address.
Disable Bonus Commissions: Selecting this will remove the Bonus Commissions tab from transactions. You should disable this option if Bonus Commissions are not commonly offered in your market.
Disable Earnest Money: Select this option if you remove the Earnest Money tab from transactions.
Hide Transaction Splits from Participating Agents: Selecting this will hide the commissions to each agent if Additional Agents have been added to the transaction, thus keeping their respective commission splits private.
Automatically Add Date and Time to Signatures and Initials: Add the date and time to all Signature and Initial blocks.
Lock Transaction Team: When a transaction is associated with a Team, the Team Name is locked and cannot be changed by Agents. If updates are needed, Managers, Accountants, and Compliance Officers have the ability to modify the Team within the transaction.
Lock Transaction Type: This will lock the transaction type created during the transaction wizard so Agents cannot change it. Managers, Accountants, and Compliance Officers can modify the Transaction Type within a transaction.
Require Locked Commissions for Certain Statuses: Commissions must be locked by a manager or accountant before a transaction's status can be changed to one that affects agent contributions for commission plans. If not locked, users will receive an error message and cannot proceed with the status change.
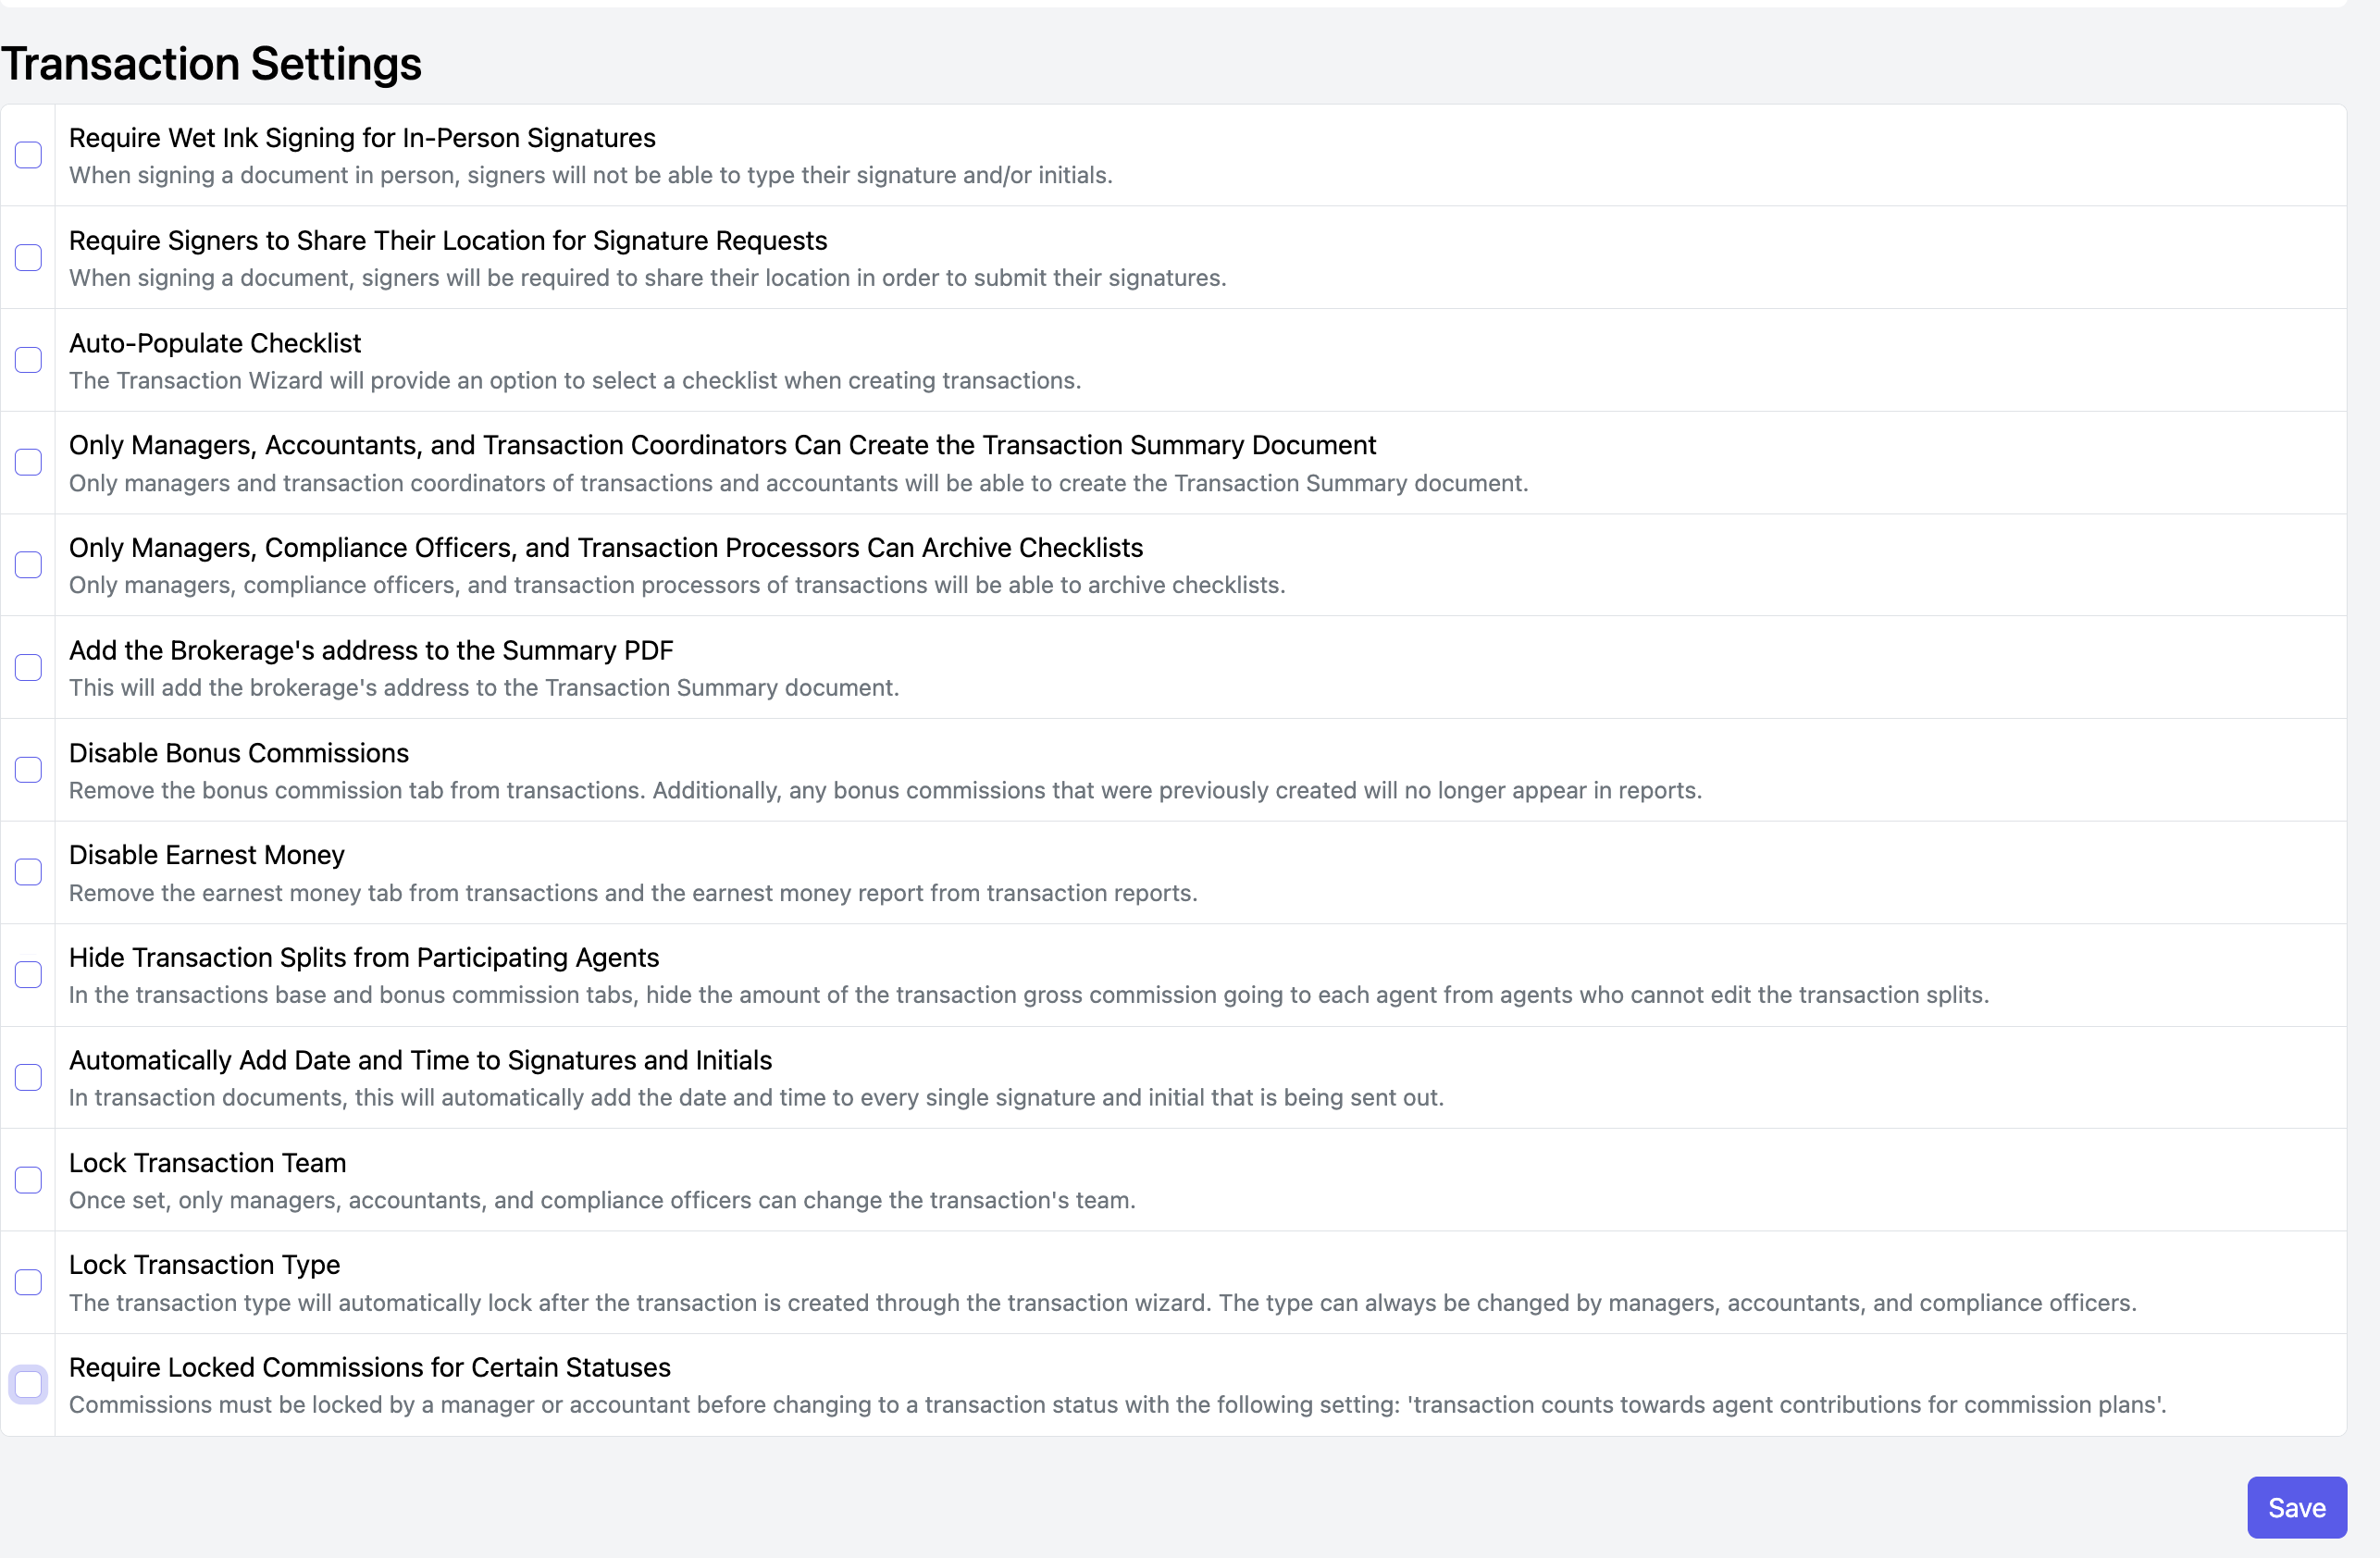
Once you've made your selections, click Save

STATUSES
Go to Setup > Transactions > Statuses
The following statuses have been created: Active, Pending, Closed, Rented, and Dead.
The initial status for new transactions is 'Active.' To change it, drag any other enabled status to the top of the list.
The settings are displayed under each status.
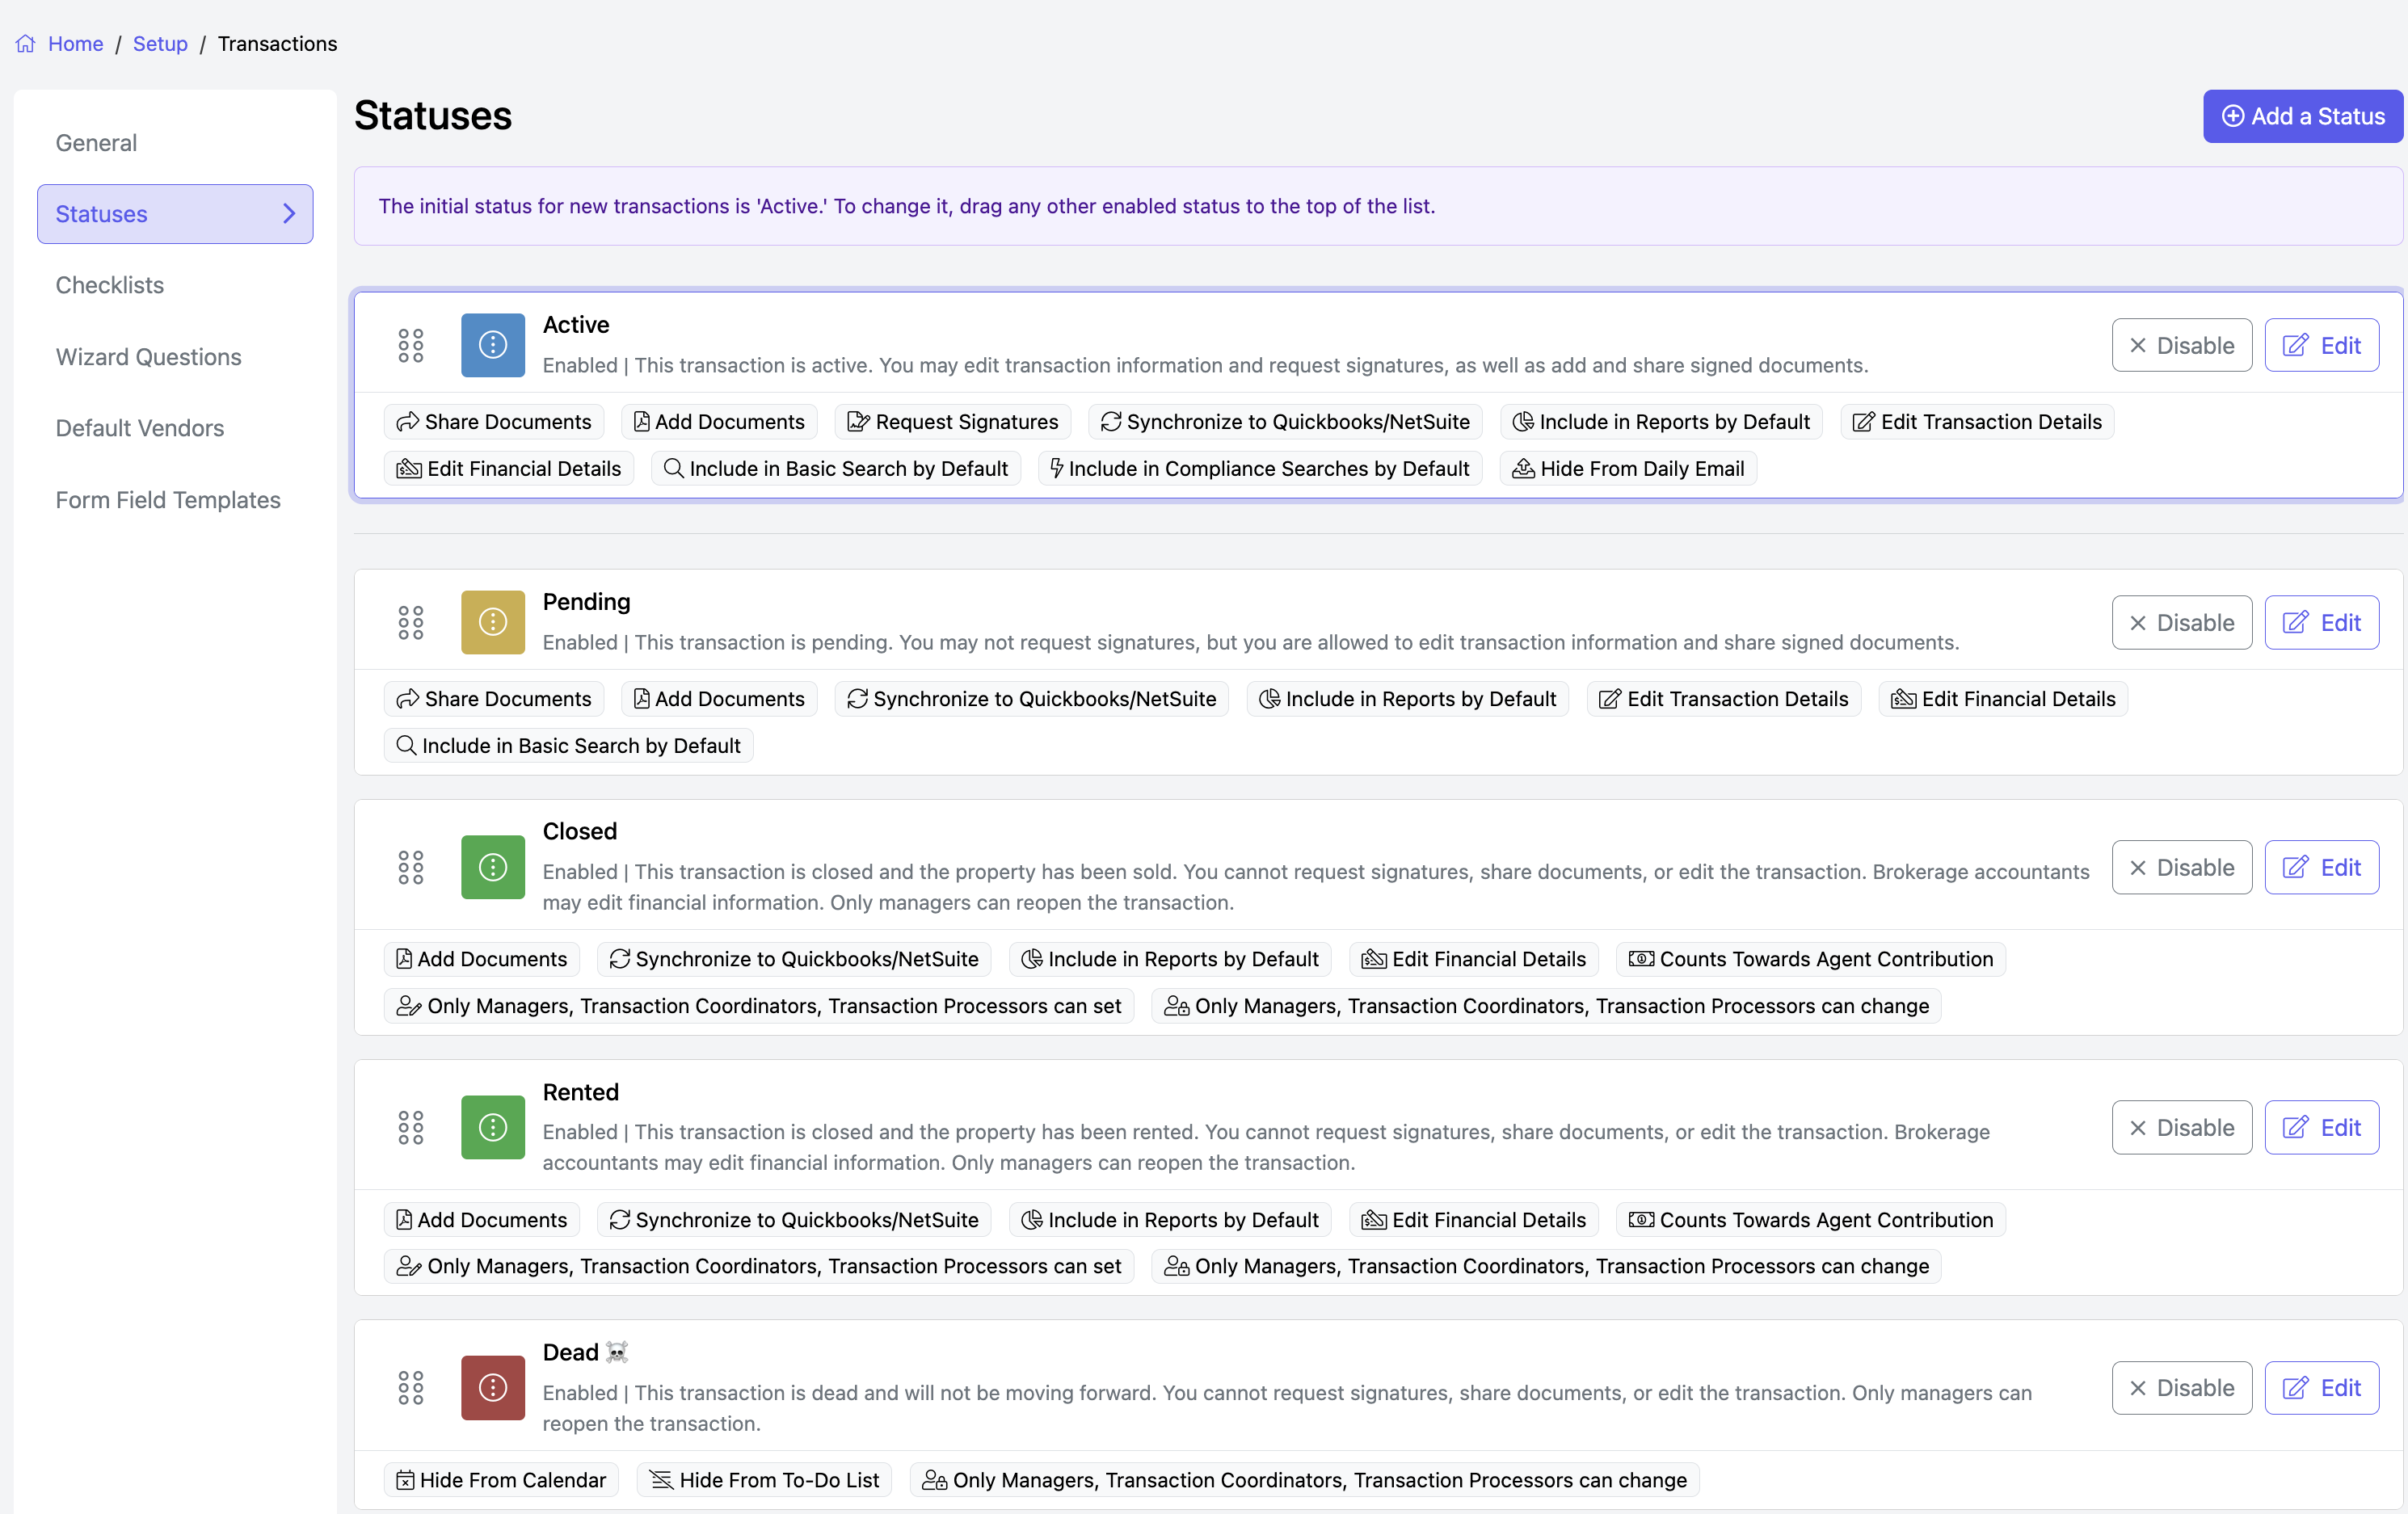
EDIT status settings
Click Edit to make changes to the settings. Changes made to statuses will apply to New transactions only. 
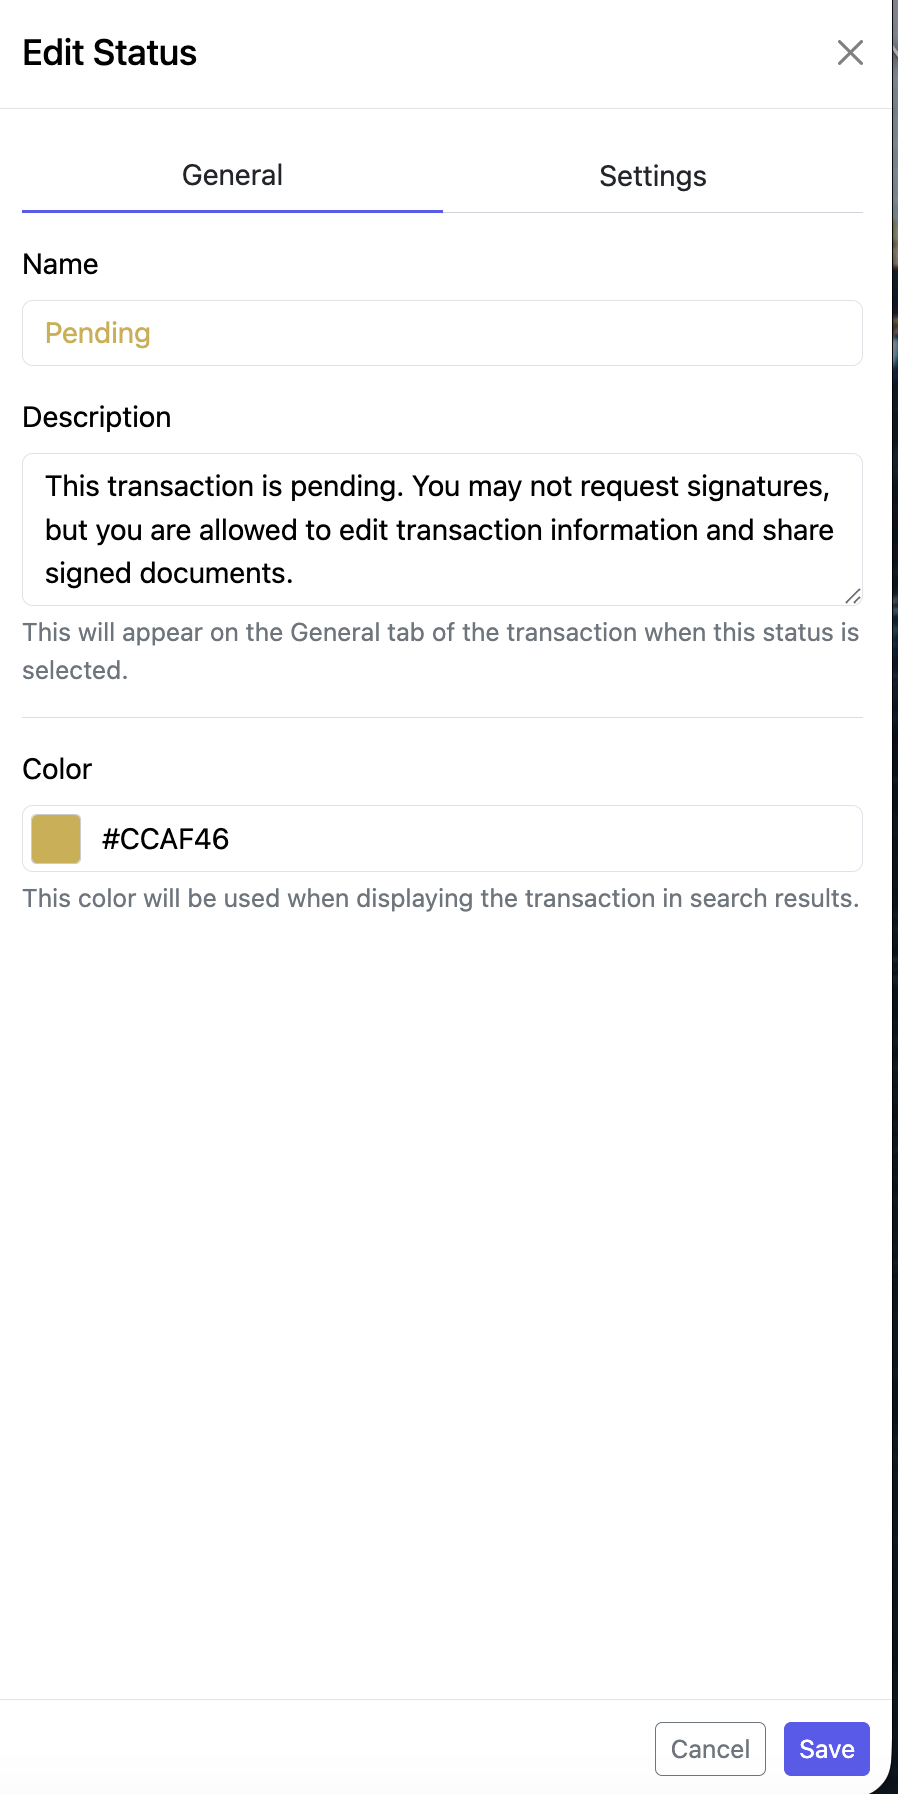
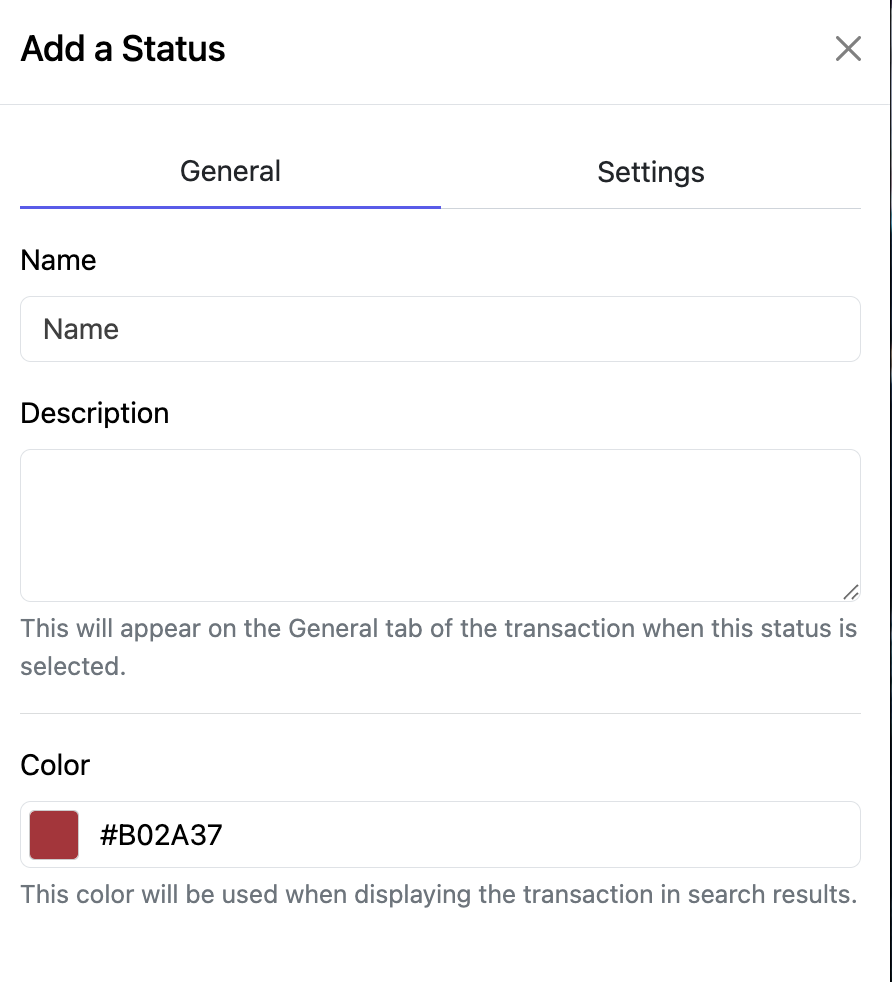
General
Name
Description: not required but helpful.
Color: You can change the color using the color picker at the bottom.
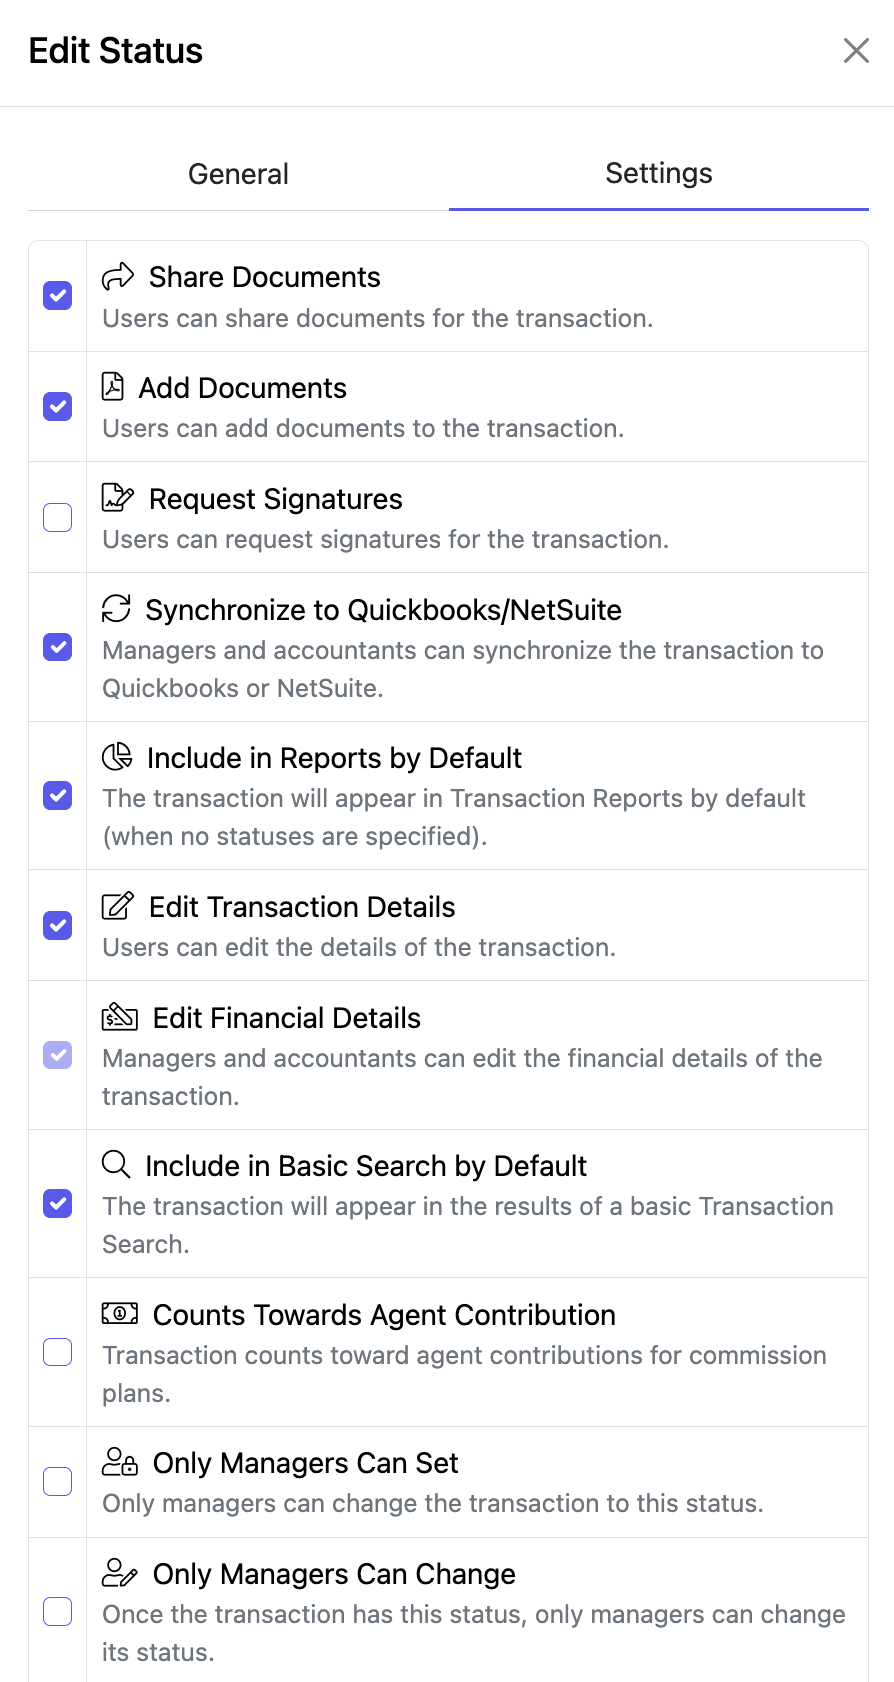
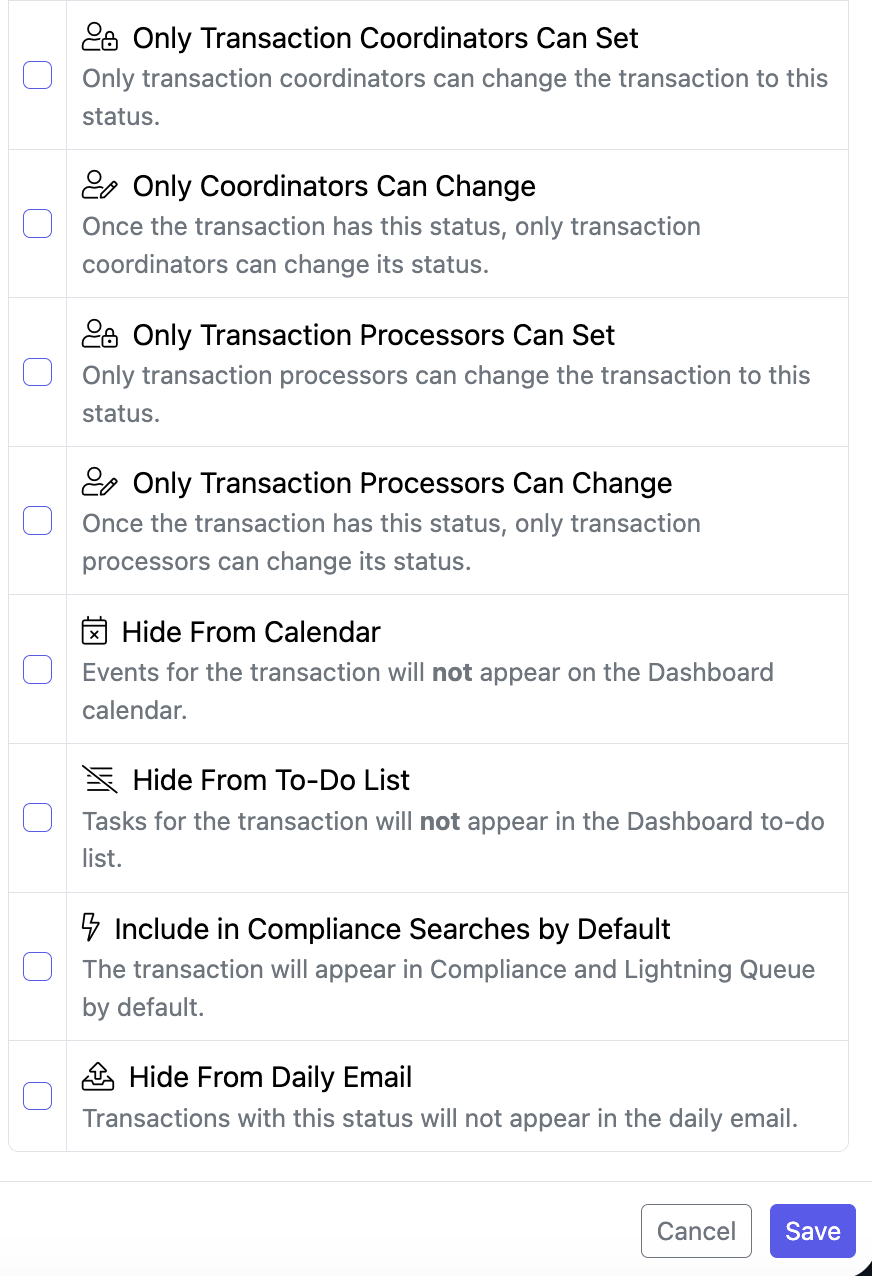
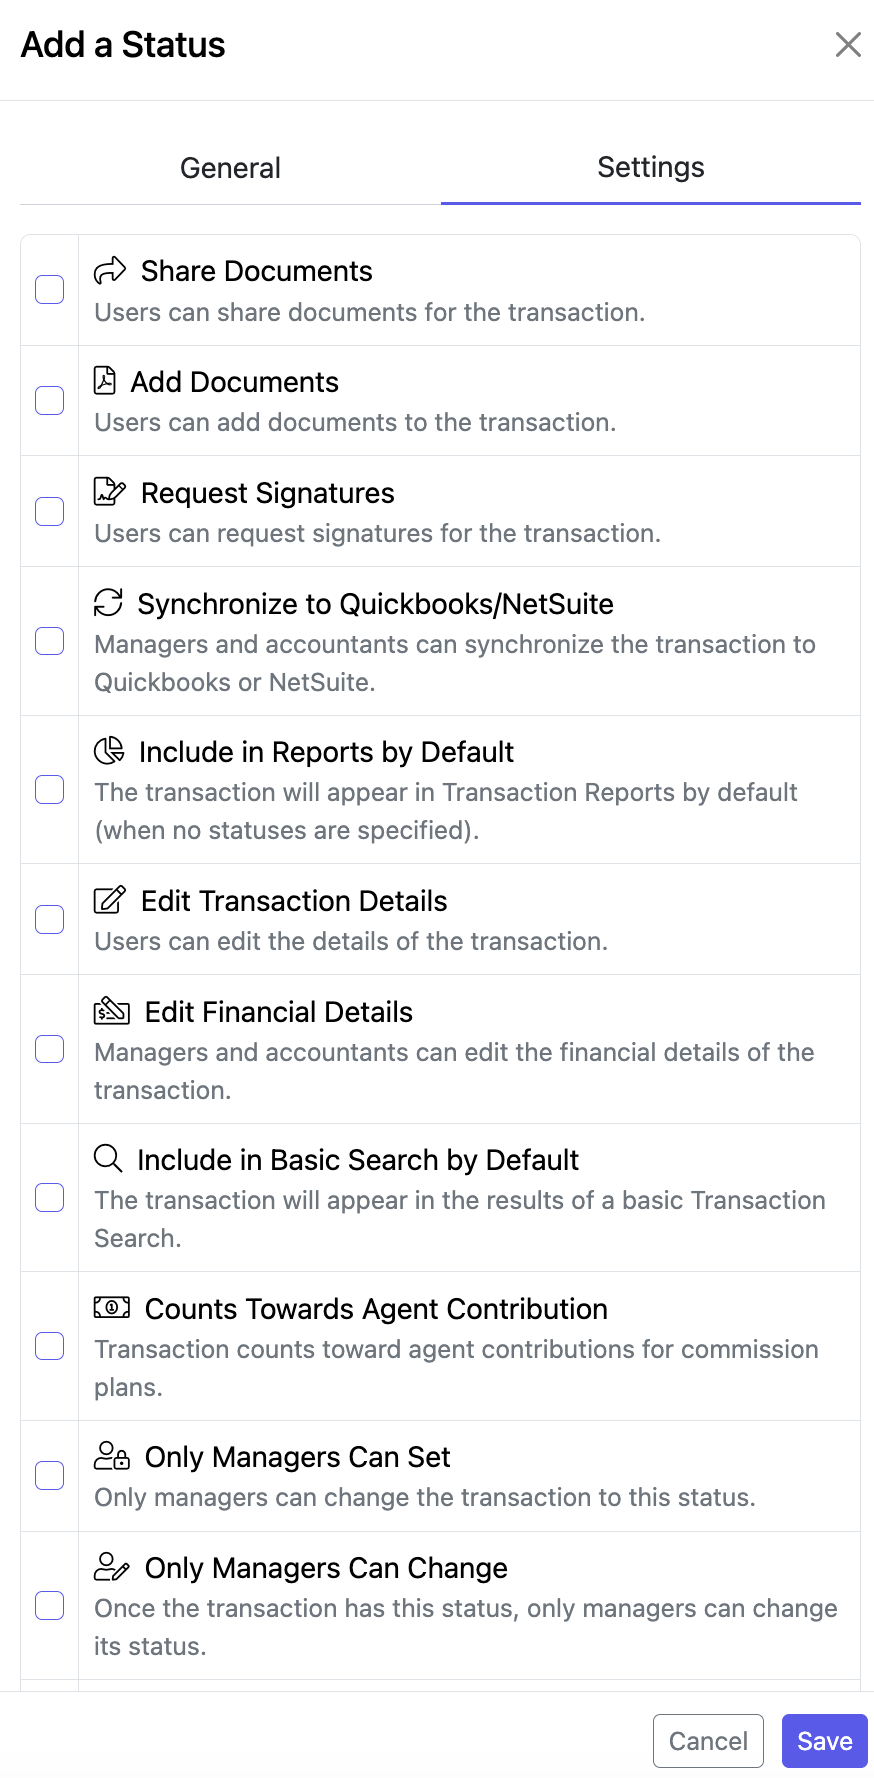
Settings
Check or uncheck based on your needs.
Be sure to click Save when finished.
- REORDER
You can reorder the statuses using the icon to the left of the status name and dragging it to the desired location.
*Please note that the first status in the list will be used by default when creating transactions.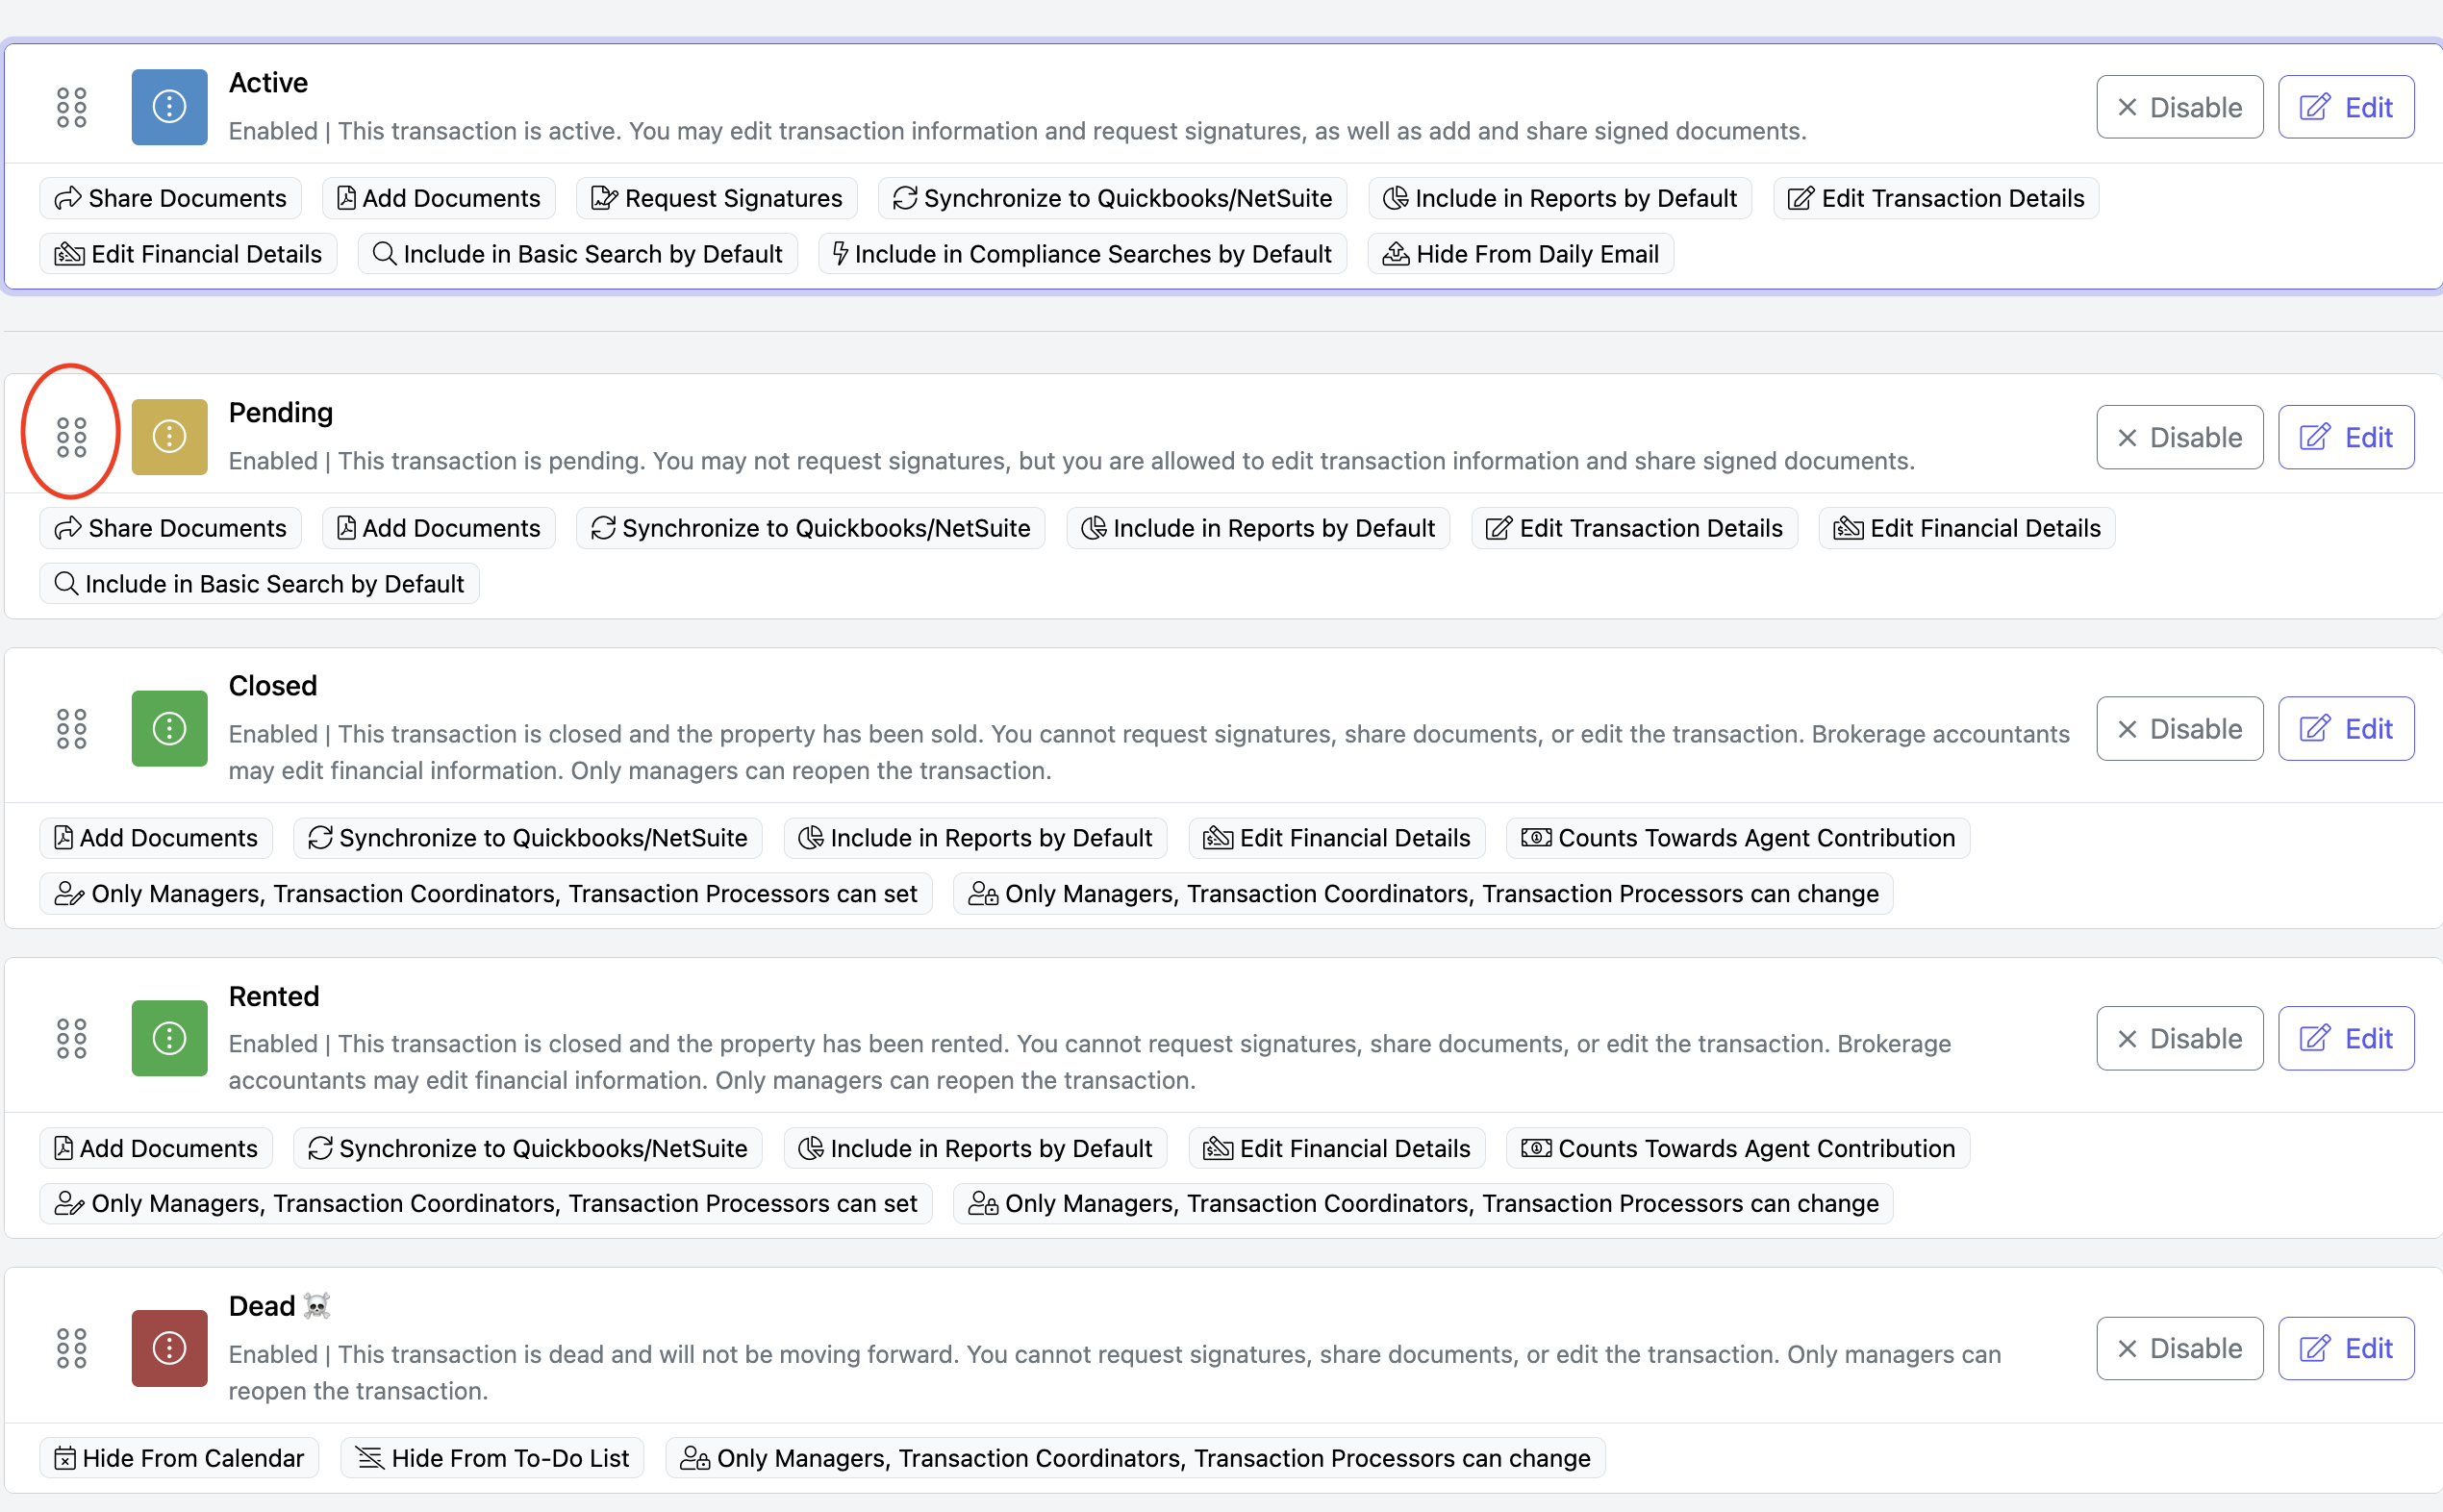
ADD A STATUS
Please note that once a status is saved, it can never be removed, only disabled.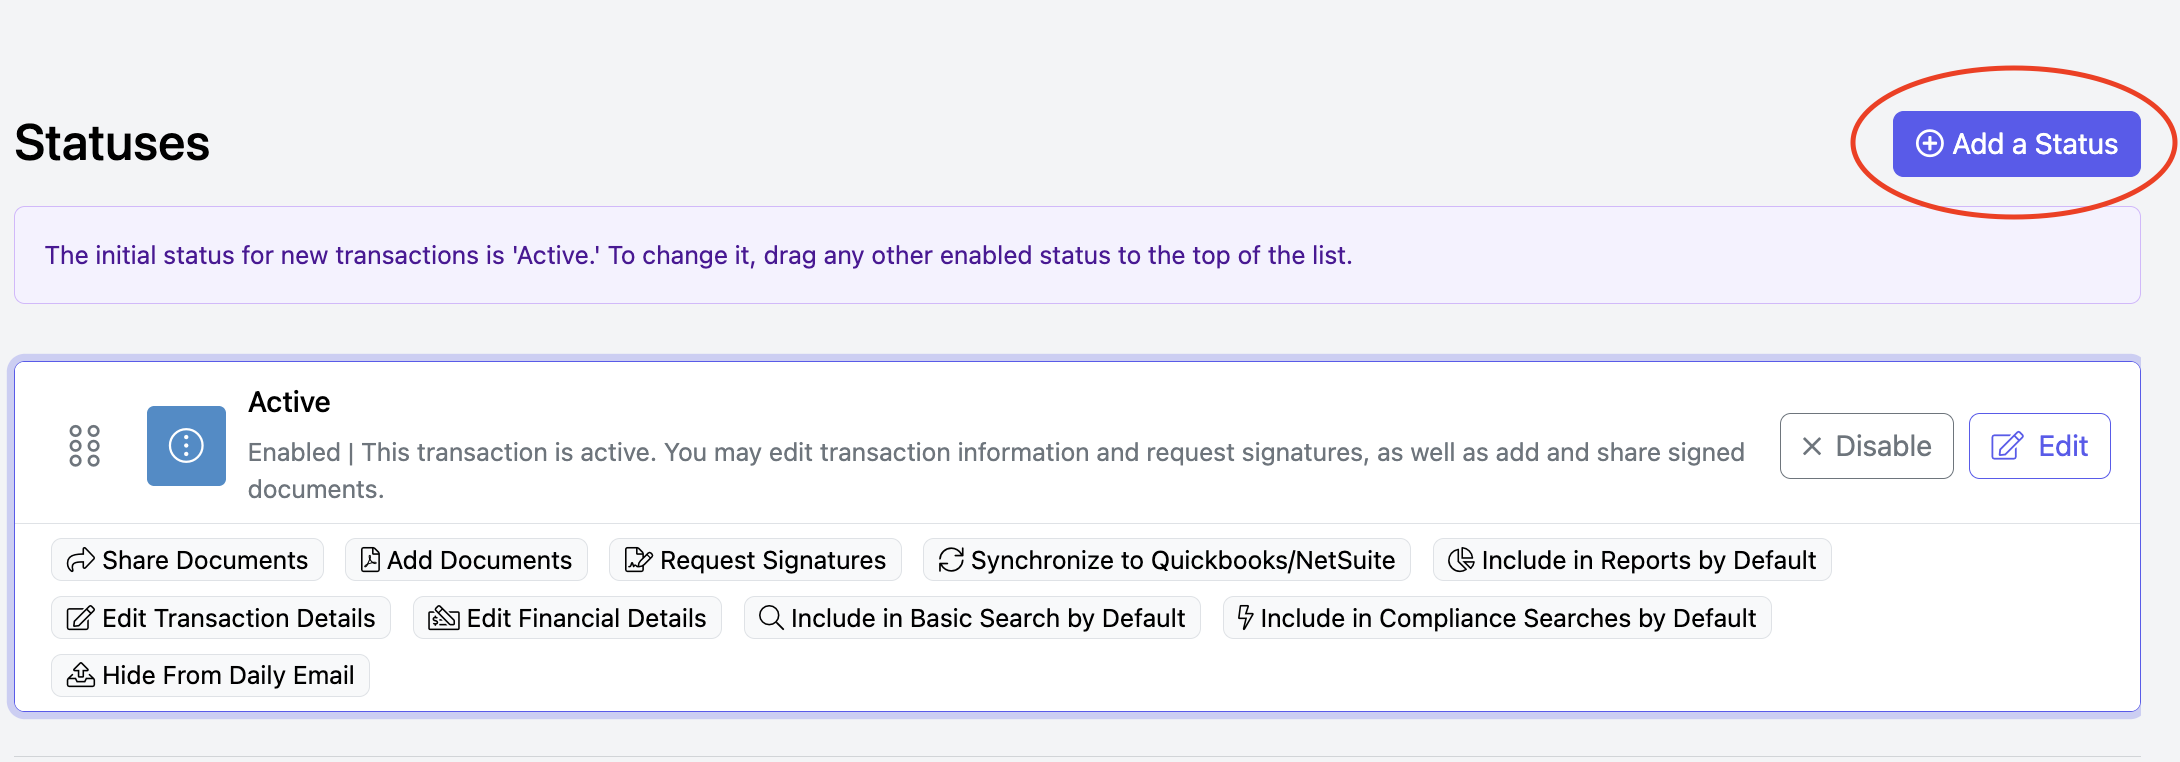
Complete the General and Settings tabs.
Remember to click Save when you are done.
CHECKLISTS

- EDIT OR VIEW A CHECKLIST
- Click on the Checklist name or click View.
- Add or edit Tasks s as needed.
- Click Save at the bottom when done.
- ARCHIVE A CHECKLIST:
- Click on the Checklist name or click View.
- Click 'Archive' in the upper right corner.
- ADD A CHECKLIST: Go to the top right of the page, and click on the “Add a Checklist” to create a new checklist.
ADD A CHECKLIST
Upon creating a New Checklist, you will be taken to a page where you can edit the following:
- Title: The name of the checklist.
- Person Type: Use the dropdown menu to select Buyer, Seller, Landlord, or Tenant
- Transaction Type: Select a transaction type that the checklist applies to. Transaction Types are configured in Setup → User Fields → Transaction Types.
- Owner: Choose who can use this checklist. You can choose the entire brokerage, a specific region, subregion, or office.
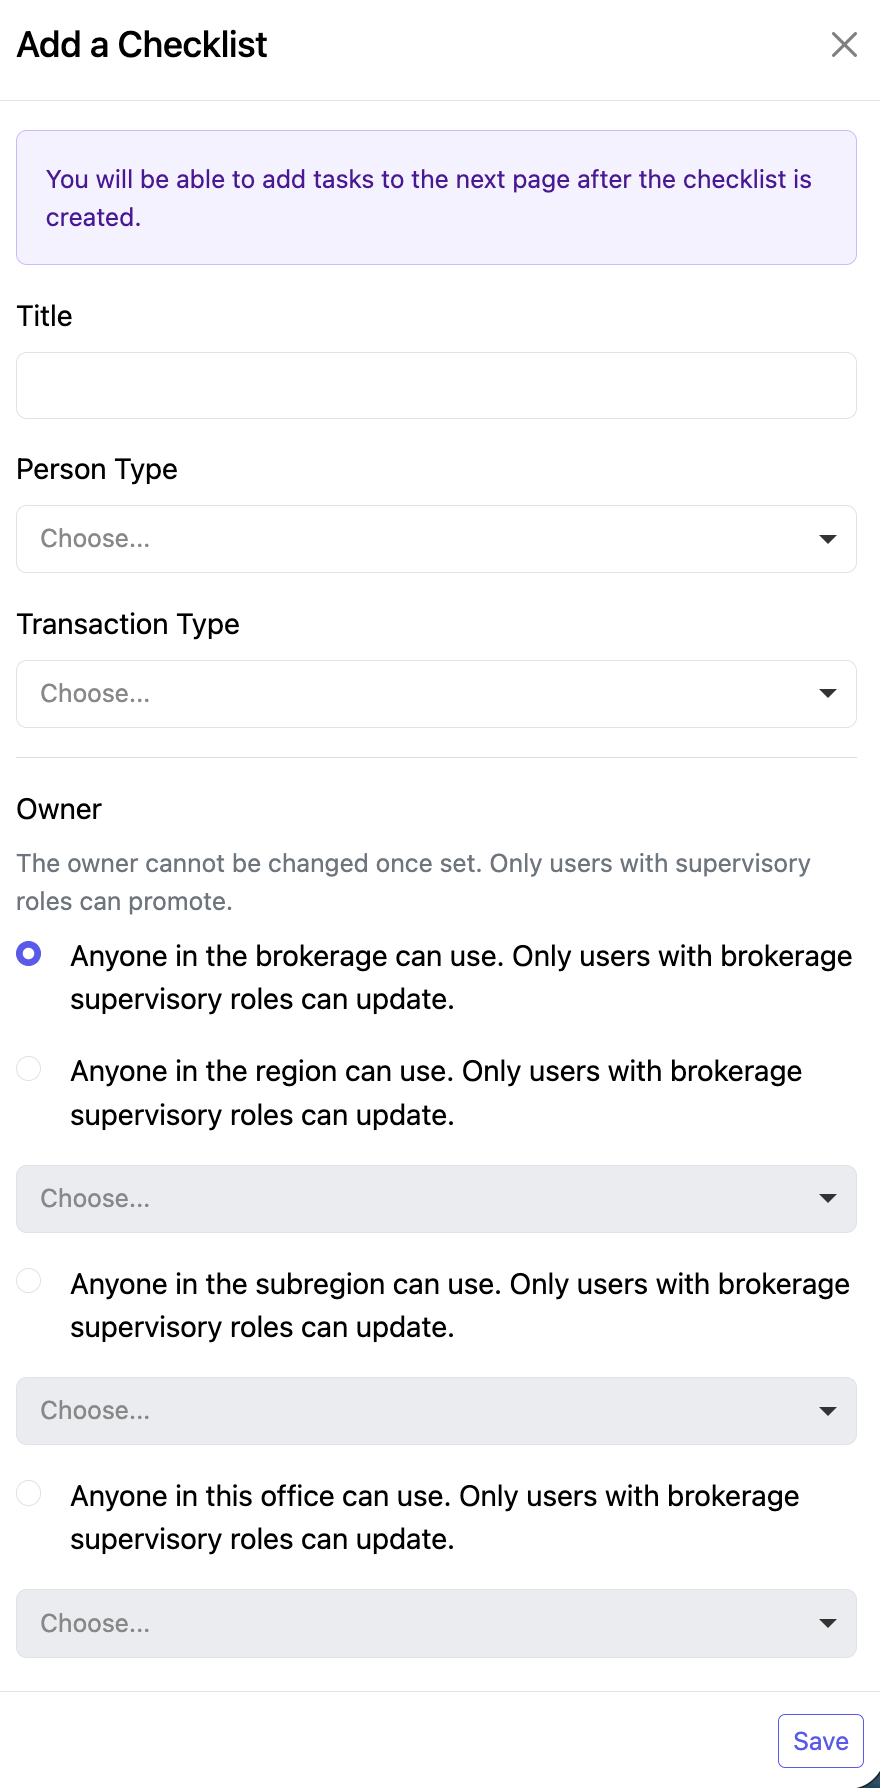
NOTE: Checklists will only apply to transactions that match both the selected person type and transaction type.
IMPORTANT: If you’ve set up transaction types in the 'Who Do You Represent' question within the transaction wizard, you must also assign these transaction types to your checklists.
Failing to do so will result in the checklists not appearing when the wizard is used.
CHECKLIST STEPS
You've added a new checklist, next, we will create the steps.
Here, you have 2 options:
• Add via AI – Answer 2 questions and AI will automatically generate the checklist tasks for you. This option will only display if the checklist does not currently contain any tasks.
• + Add a Task – Manually build the checklist by adding tasks one at a time.

Add via AI - complete the information and click Generate Tasks at the bottom to create your tasks.


When the checklist displays, you can edit the tasks as needed.
- Click the trash icon to the right of a task to remove that step, or use the icon to the left of the task to drag and reorder the steps.
- You may also edit the Description and choose whether the step should be marked as Active or Inactive.
- Once you have finished making your changes, be sure to click Save at the bottom of the page.

+ Add a Task

- When building checklist tasks, enter the Description, select the task Type from the dropdown menu, and check the Required box if the step is mandatory (leave it unchecked if the step is optional).
- Continue this process until all checklist steps have been added.
- Once you are finished, be sure to click Save.
Description examples:
- Please add a link to the Property record to the Notes section in the General tab
- Upload the fully executed Agreement and Addenda
- Change the status to Pending on the General tab
Type:
No Review Required: This is a task for the agent to do.

Select Documents: The agent will be required to select document(s) for review before checking off the item as complete.

Request Review: An agent will be required to request a review to compliance before they can move forward in this checklist. All items must be completed or marked as not applicable prior to this review before the review can be submitted.

Require Property Information: Requires the Property tab of a transaction to be saved at least once.

Require Financial Information: Requires a specified field within the Financial tab of a transaction to be completed. If this option is selected, another dropdown will appear below to specify which financial information is required.

Require Date Information: Requires a specified field within the Calendar tab of a transaction to be completed. If this option is selected, another dropdown will appear below to specify which date is required.

Require Commission Information: Requires the Base Commission tab of a transaction to be saved at least once.

Require Transaction Status: Select the transaction status that will be applied when that step is completed.


You can choose to make the item required (which means they must complete it), and/or choose to make it active (if your want it to show up in the checklist).
Please note that task types of Require Information will have the required checkbox locked on.

You can also change the order of the steps by dragging the icon to the left of a step and dropping it in the desired location.

To remove a step from the workflow, clear the checkbox in the Active column, then drag the step to the bottom of the list.
Steps cannot be deleted, but inactive steps will not be used in the workflow. 
Make sure to click on the blue "Save" button when you're done.

WIZARD QUESTIONS
Wizard Questions dynamically guide agents through the transaction creation process by tailoring forms based on their responses. This ensures that only the relevant forms are included, streamlining the entire workflow.
To use the Wizard Questions for forms, you first need to create a "Group(s)" located in the Transactions >Forms Library. Click Here for more information.
Wizard Questions use clear, step-by-step language to simplify the transaction process. Each answer provided by the agent maps directly to the appropriate forms, ensuring accuracy and efficiency.
Once the questions are configured:
Agents are automatically provided with all the necessary forms.
Manual selection of forms is eliminated, saving time and reducing errors.
EDITING WIZARD QUESTIONS
Wizard questions fall into two categories: Brokerage and Office.
To view or edit questions for the Brokerage or a particular office, you can either click on the name in the Question Set Name or click "View" to the right.


ADD A NEW WIZARD QUESTION
Click “+ Add a Question”
You’ll be taken to the Edit Question screen, where you can create your question by typing it into the text bar.
To automatically organize the selected forms into a folder within the transaction, check the box labeled:
“Create a folder in the transaction that contains the forms selected by this question. The folder name will be the form group name.” This helps keep your transaction documents neatly organized based on the form group selected.

Click +Add Answer as needed.
Click Save when finished.
EDITING QUESTIONS AND ANSWERS
To edit existing questions, click on the white "Edit" button to the right of the question.

To delete a question, simply click "Delete" at the bottom left of the page.

To change the order in which the questions will appear, drag and drop using the icon in the Order column.

If you want to undo the changes you made to an existing question (before you hit the blue "Save" button), you can select "Discard Changes".

Make sure to click “Save” at the bottom when you’re finished.

DEFAULT VENDORS

Here you can choose the number, and which vendors will automatically be a part of transactions according to the type of transaction (i.e. Seller, Buyer, Landlord, Tenant).

To make changes to the Default Vendors, simply Click on the Person Type and you can Delete, Edit or Add a Vendor.
Select the Vendor Type from the dropdown menu on the left.
Choose a specific vendor from the options on the right.
NOTE: You can only select vendors that have already been added to the CRM, with the Brokerage set as the owner.
Make sure to click "Save" at the bottom right when finished. 
FORM FIELD TEMPLATES
Form field templates saved from documents will appear here.

Click Edit to rename or archive a template.

Click Save when finished.